
About the Course
Royal Melbourne’s Composite Course is continually rated in the top 10 golf courses in the world, featuring the work of two great golf course designers, Alister MacKenzie and Alex Russell. The Composite Course came into being in 1959 when Royal Melbourne was asked to hold the World Cup (known as the Canada Cup at that time).
Royal Melbourne’s two courses are known as the ‘West’ and ‘East’ courses. It was decided to use 12 holes from the West Course and six holes from the East Course for the World Cup, and hence the Composite Course was born.
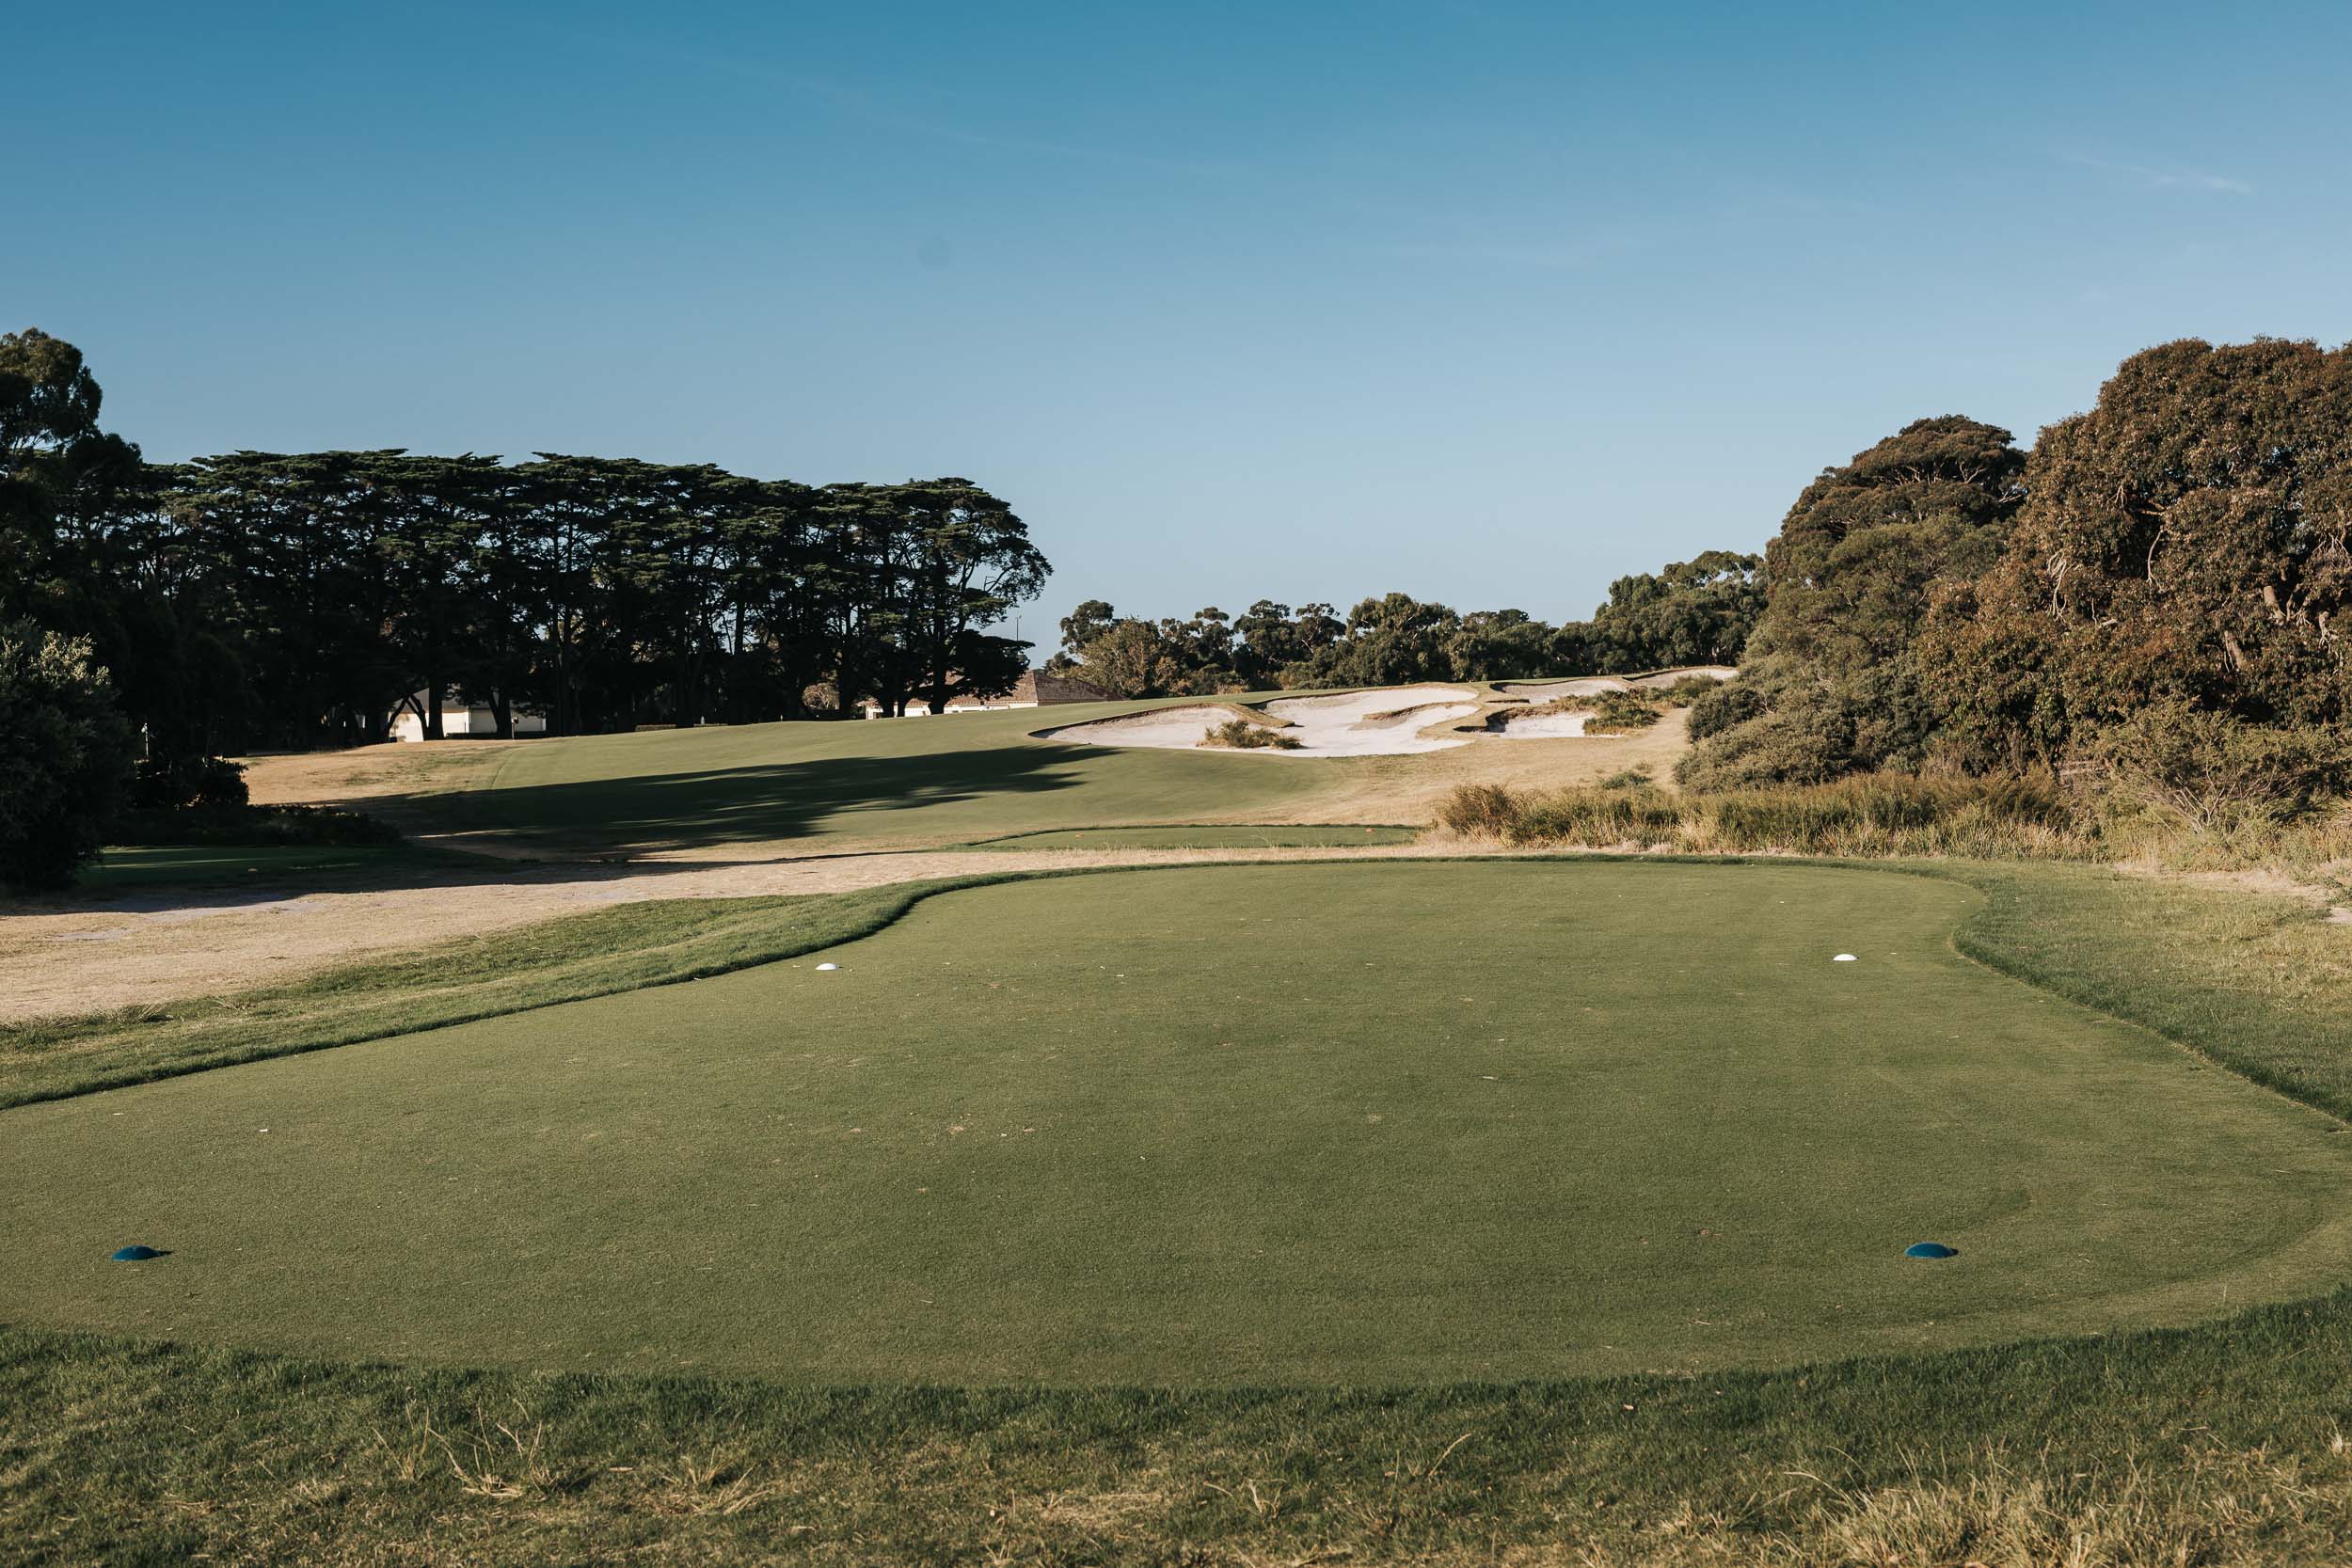
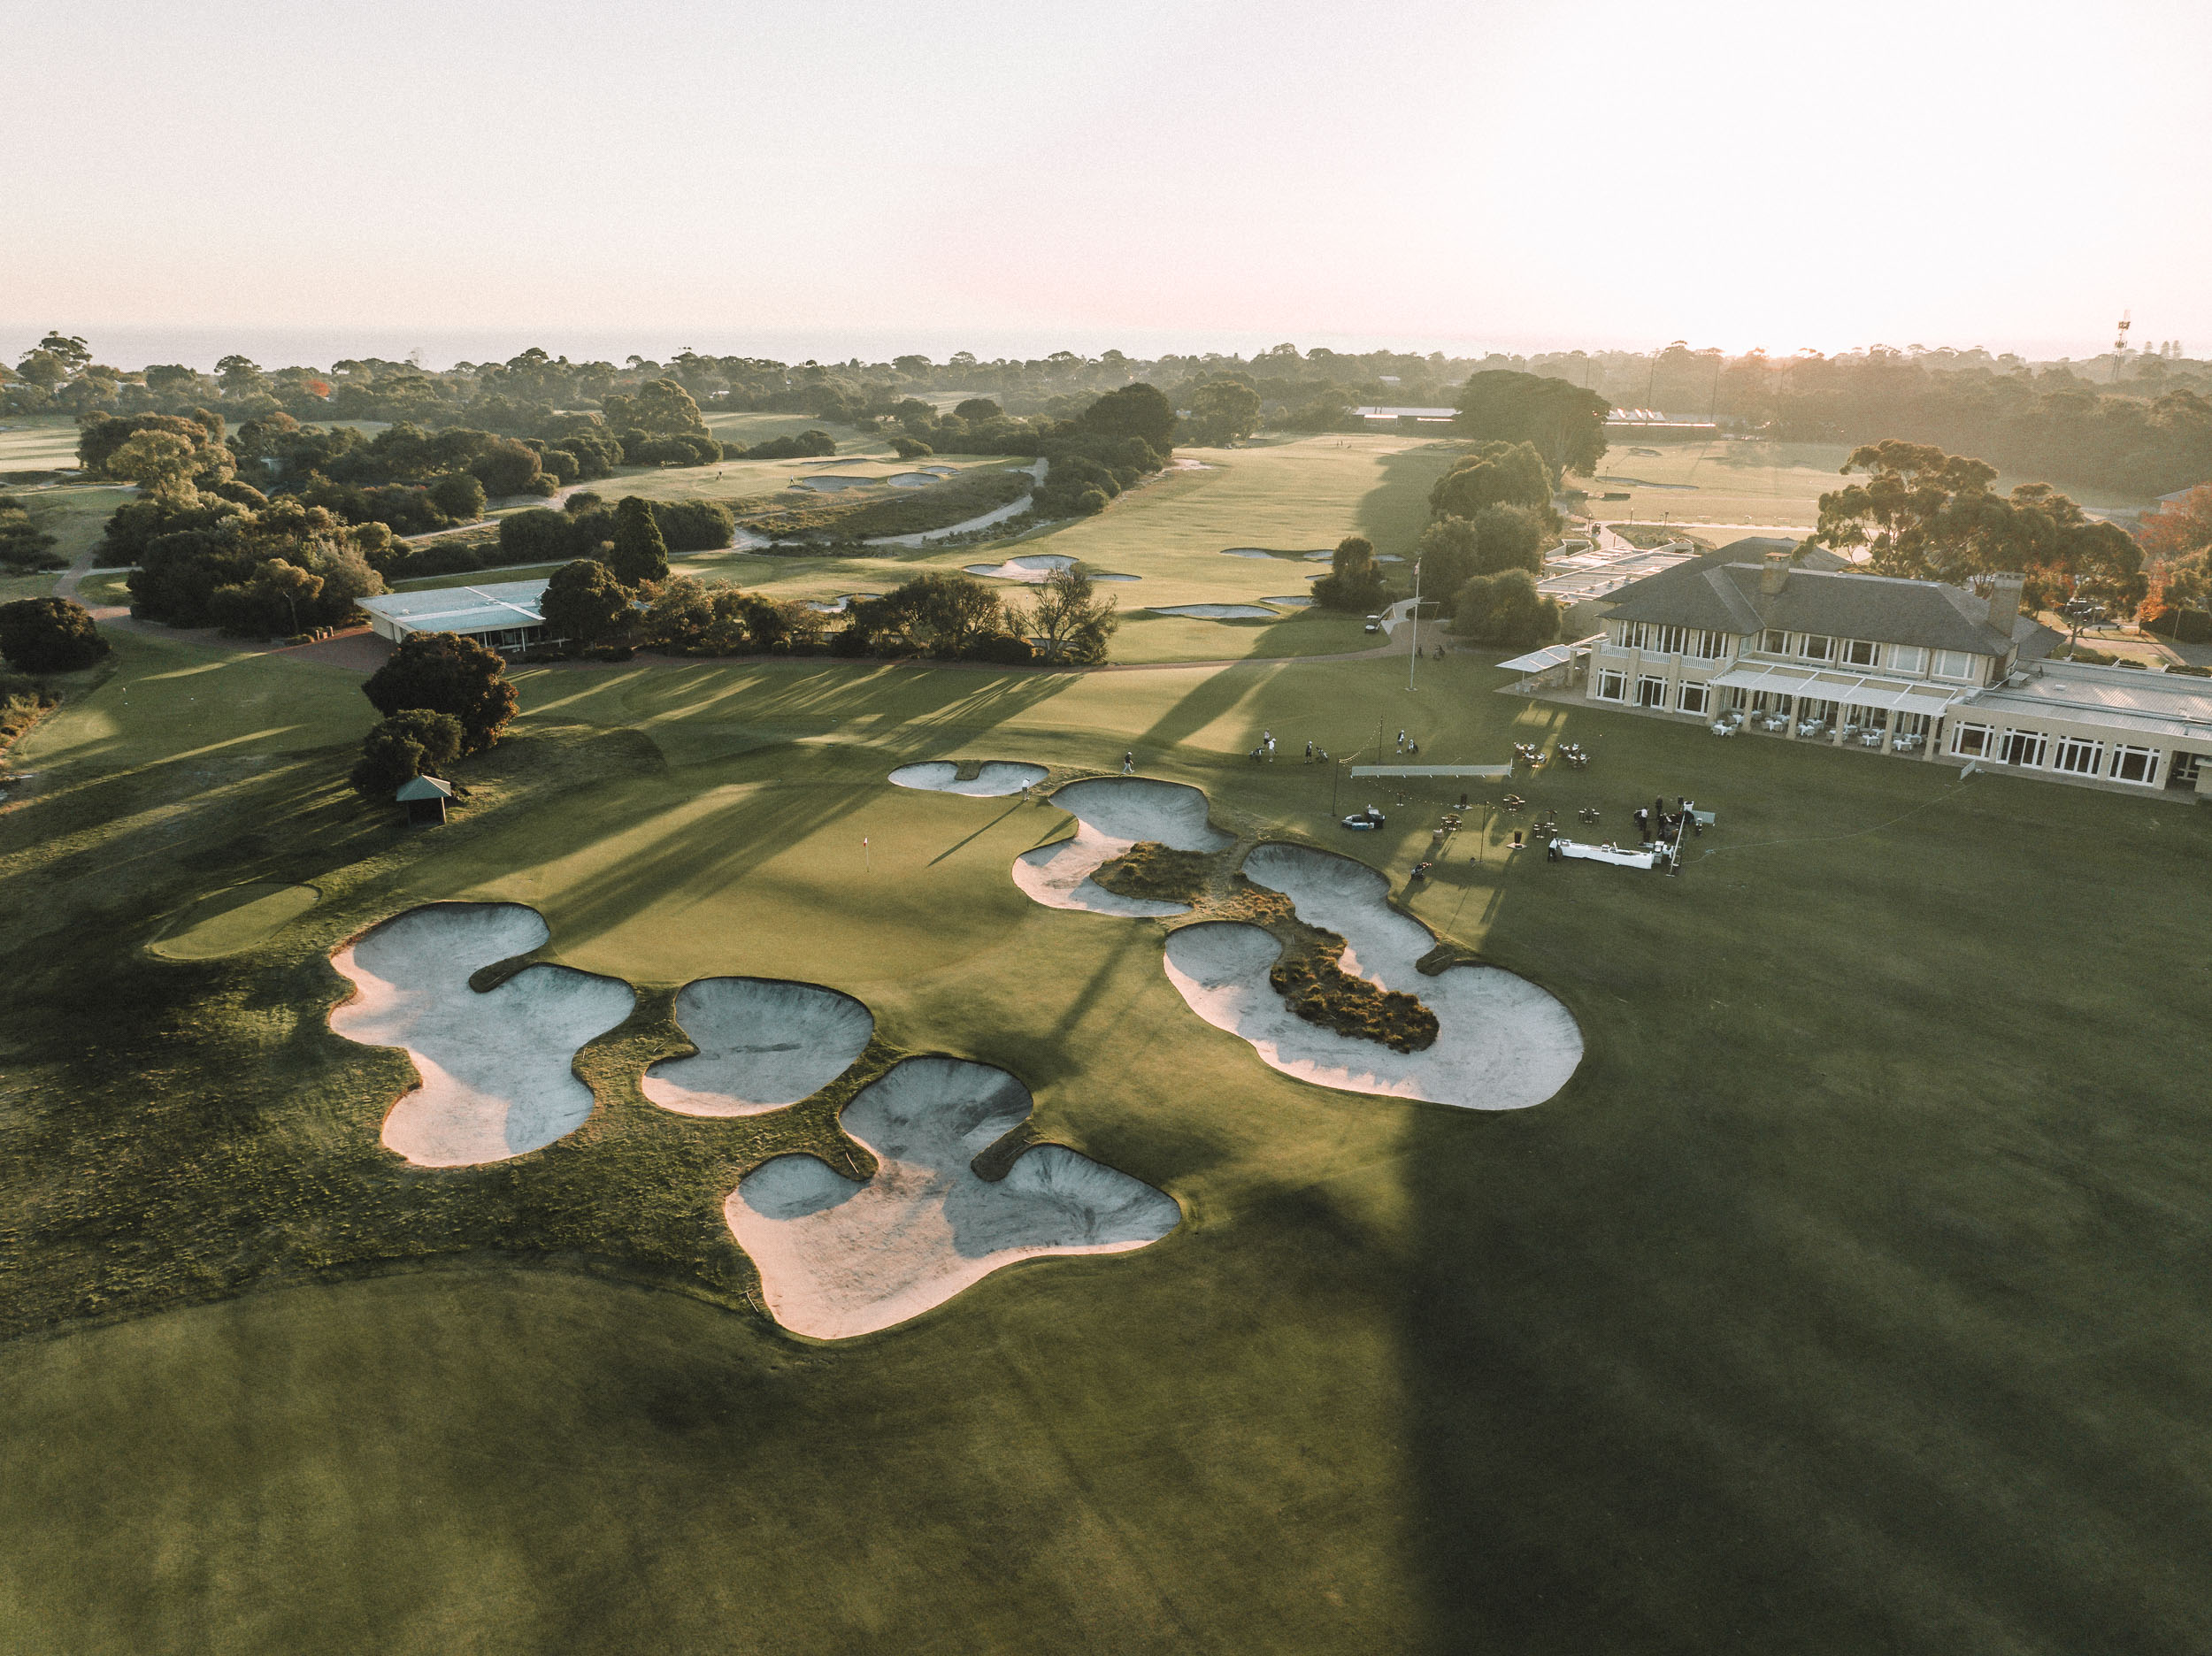
The result is a golf course of outstanding quality, with an intriguing mix of Scottish Links characteristics and rugged Sandbelt beauty. The course also has the reputation for having possibly the fastest putting greens in the world. The course is also famous for its large and dramatically shaped bunkers.
The course is ranked amongst the best in the world by numerous international golf course ranking bodies and publications.
Royal Melbourne’s Composite Course is continually rated in the top 10 golf courses in the world.
The Composite Course Breakdown
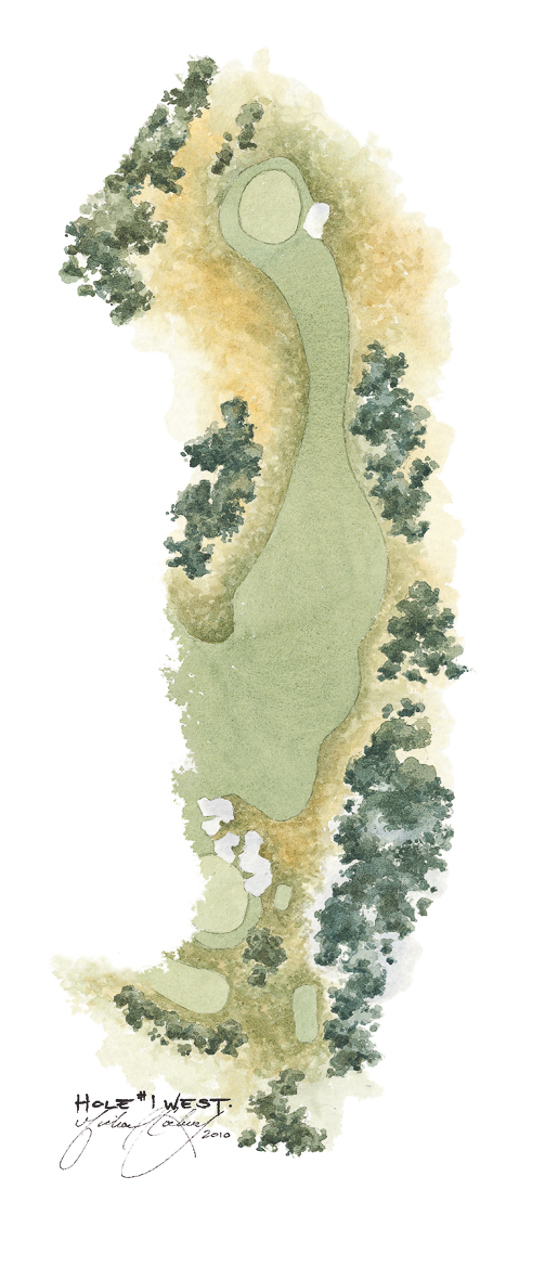
The Composite Course – 1st Hole
Par-4
392m / 429y
330m / 361y
In the fashion of the Old Course at St Andrews, the opening drive on the Composite Course is far from complicated. The fairway is large, but begins to narrow at a point where the longer hitter might reach with a big drive. The green follows the lead of the fairway, unguarded by sand apart from a small bunker on the right, A swale on the front left of the green increases the challenge of the second shot.


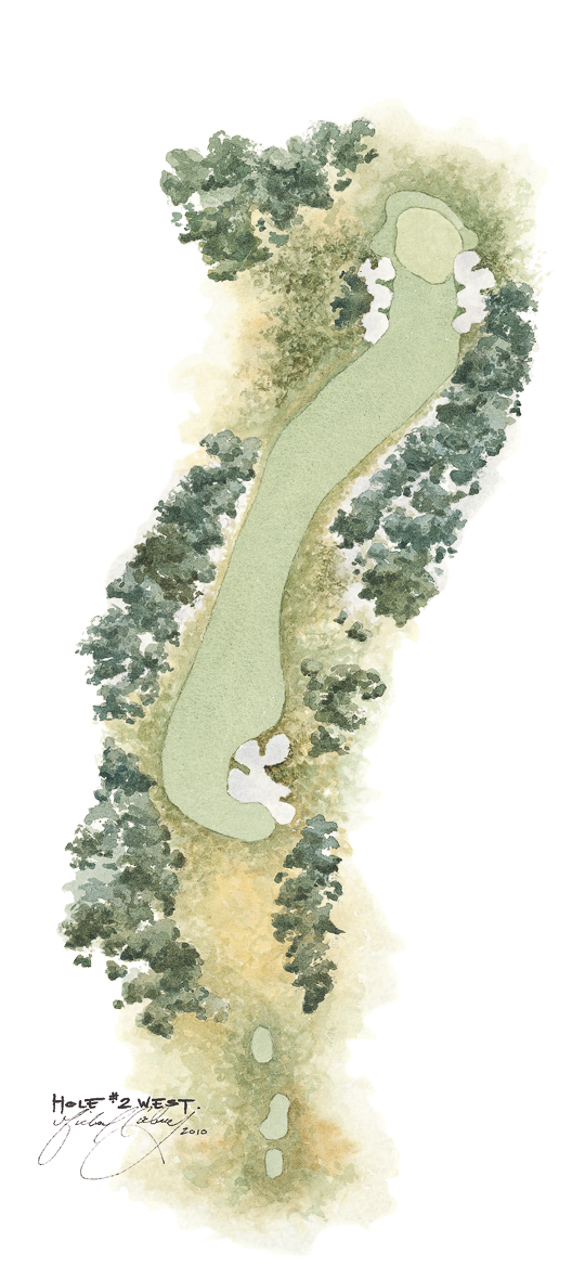
The Composite Course – 2nd Hole
Par-5
449m / 491y
381m / 417y
Once described by West Course record-holder, Tom Crow, as one of the great risk-reward holes, the second hole rewards the player who makes the longest carry from the tee across the right edge of the fairway bunkers which cuts across the fairway on the direct line of the hole. The long second shot is influenced by the distinct slope of the green from right to left. Players who get too aggressive and run through the green face a very fast and difficult return shot.


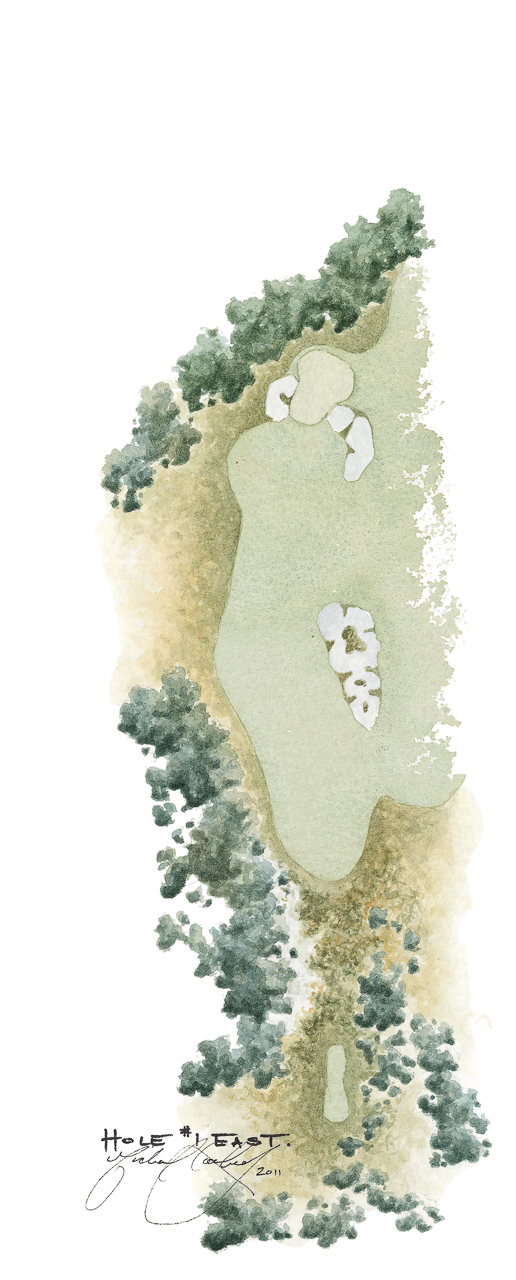
The Composite Course – 3rd Hole
Par-4
304m / 333y
283m / 310y
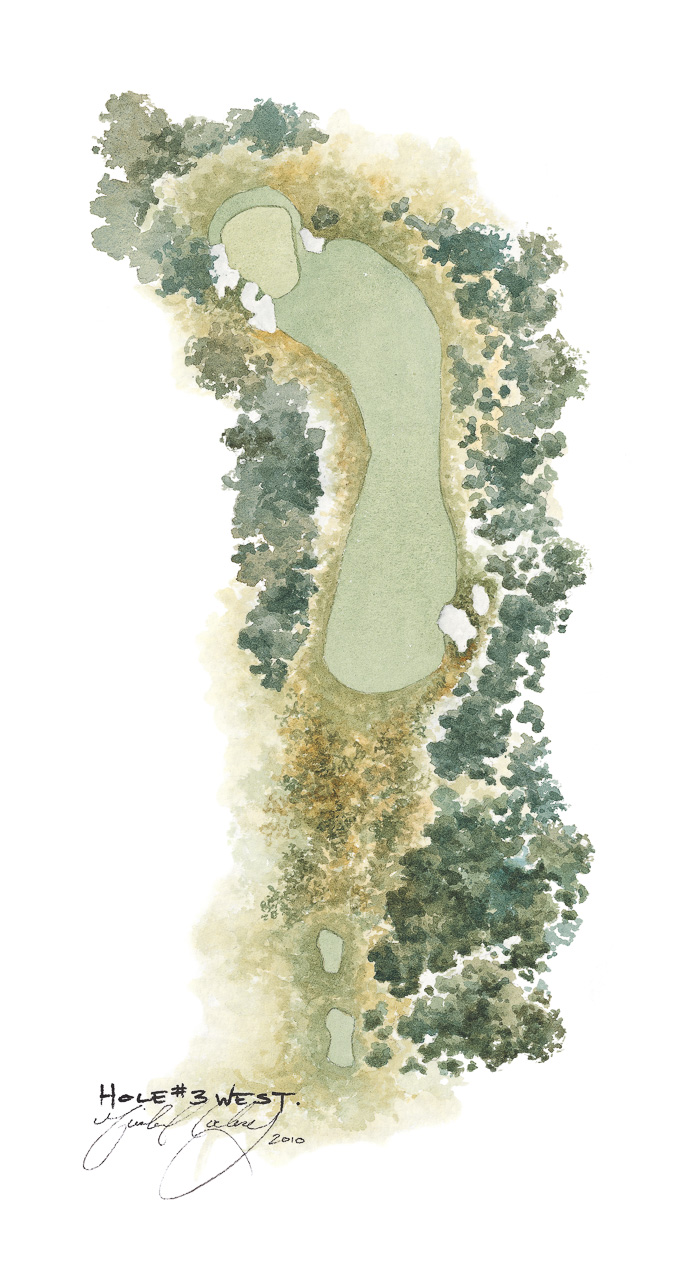
The third hole on the Composite Course is a short two-shotter. The fairway is wide and the bunkers on the right hand side are shared with the eighth hole of the West.
There is an option to drive directly over the sand, but the pin position on the small fearsome green will dictate the strategy. The deep bunker protecting the front right hand corner of the green must be avoided as saving par from this position is near impossible. From this high point, the green tilts steeply down to the bottom left hand corner.


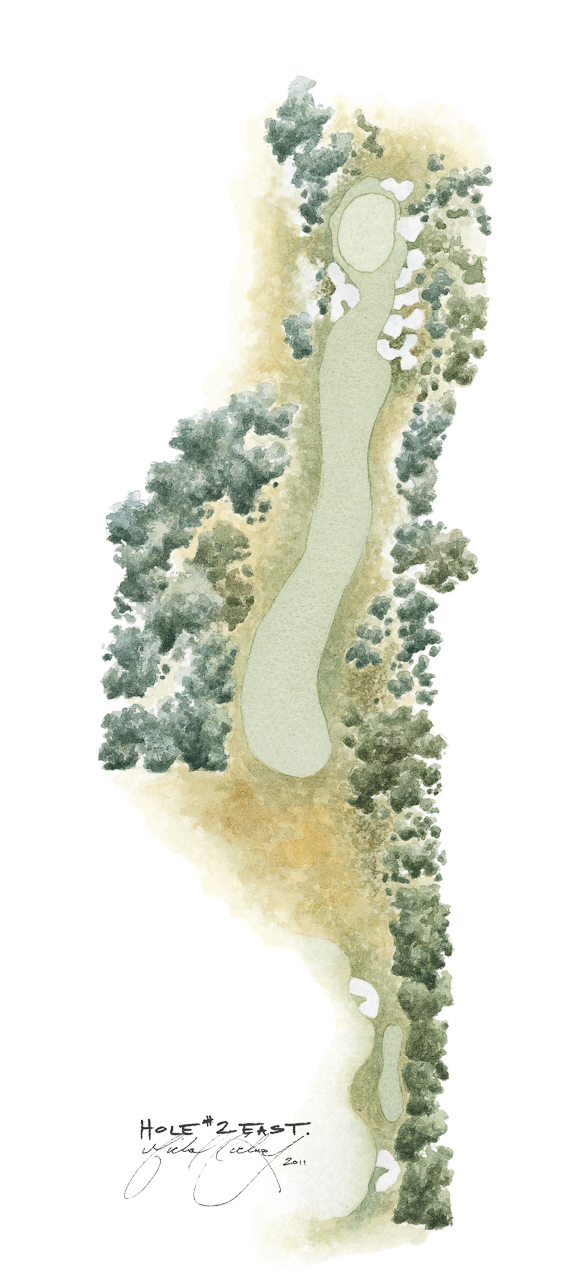
The Composite Course – 4th Hole
Par-4 (Par-5 for Women)
402m / 440y
370m / 405y
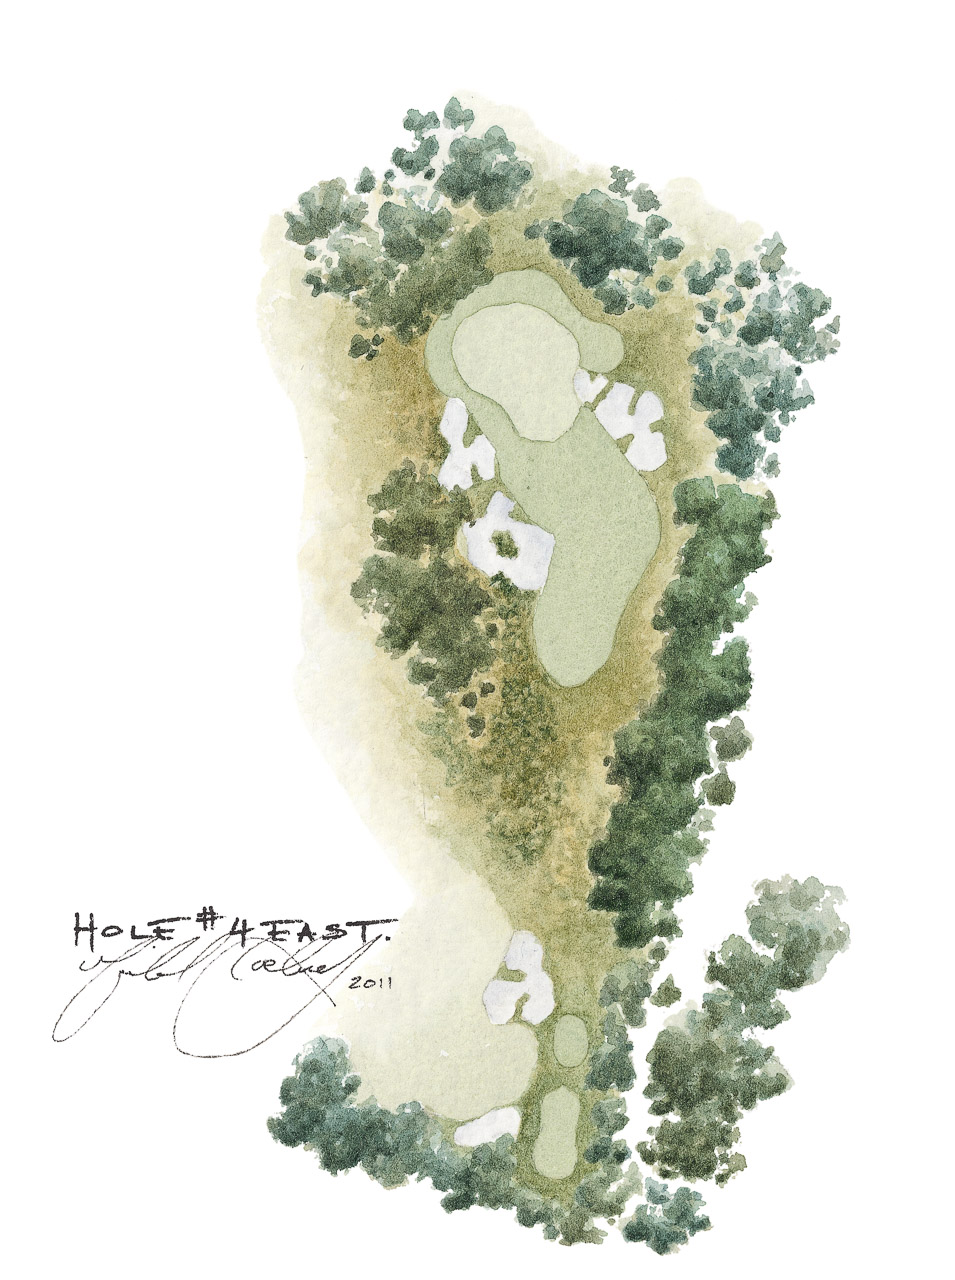
The fourth is one of the narrowest and most dangerous driving holes on the course. Most of the view of the right half of the fairway from the tee is obscured, resulting in uncertainty as to the precise driving line.
The second shot plays steeply up to and long and narrow two tiered green. Whilst there are no fairway bunkers on this hole, seven bunkers flank the green on both the left and right hand sides. A well judged second shot is required here as ninety per cent of shots finish up well short.


The Composite Course – 5th Hole
Par-3
161m / 176y
130m / 142y
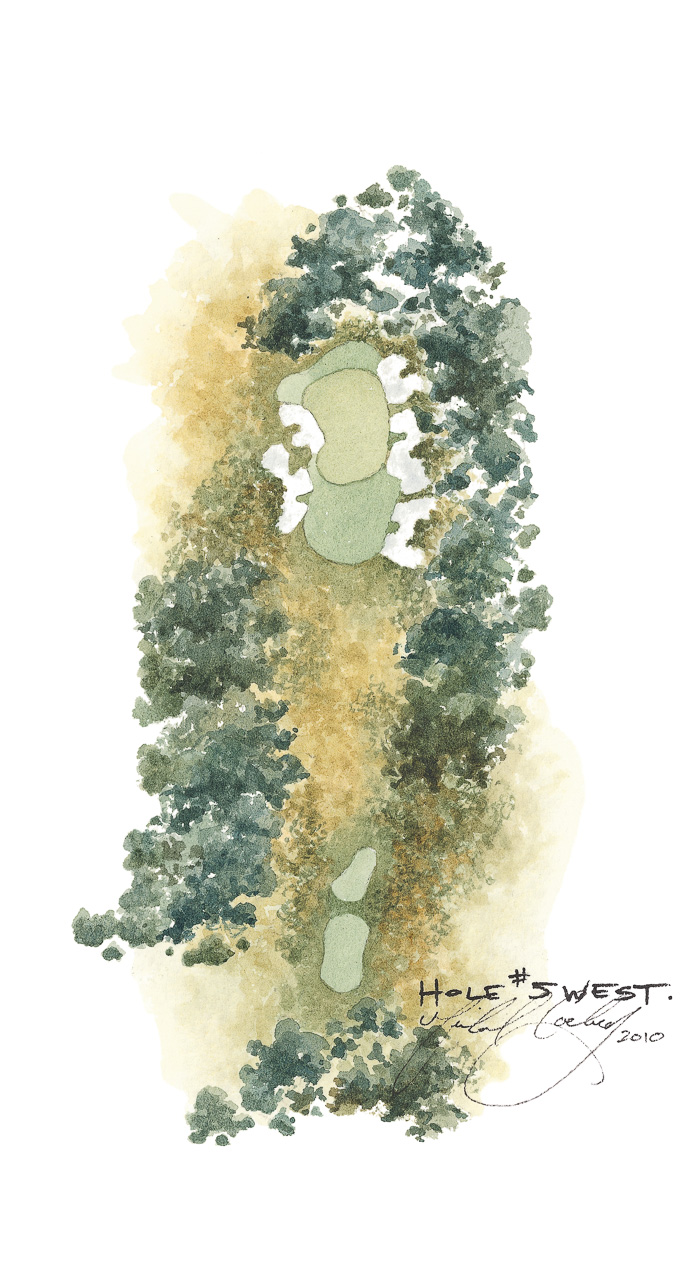
The fifth is the first one-shotter on the Composite Course. It is one of the best par threes in Melbourne, which makes it one of the best in the world. The hole plays down from the tee, across a valley and up to a green sitting on the opposite hill. The key aim in playing the fifth is to get the ball up onto the putting surface; anything short is swept back down the bank fronting the green. Anything too long leaves a treacherous downhill putt.


The Composite Course – 6th Hole
Par-4
391m / 428y
337m / 369y
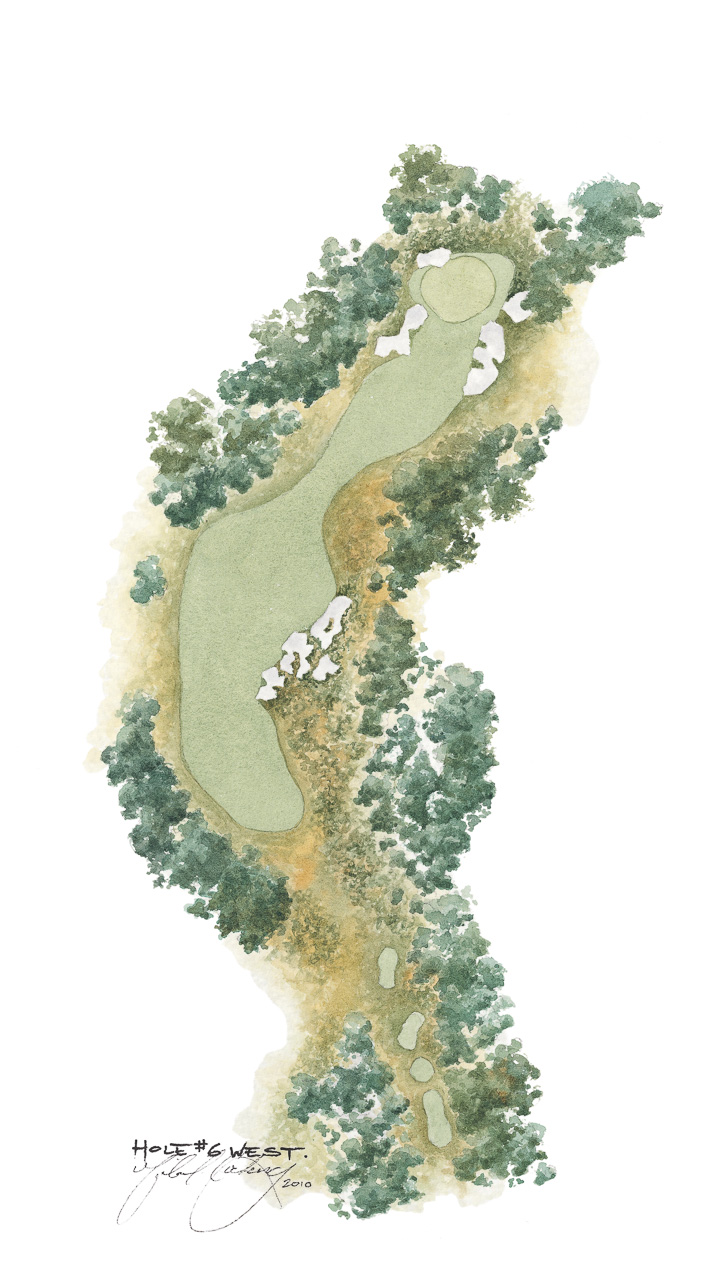
The sixth hole is one of the great two-shot holes, a wonderful example of how to perfectly position a ground hazard on the inside corner of a dogleg. The tee shot is played over a magnificent expanse of heath and sand. The player must then make a decision whether to attempt to carry over the bunkers at the corner of the dogleg, or to opt for discretion and hit further to the left.
A long drive over the bunkers to the far edge of the fairway leaves a difficult second shot over one of the most awkward greenside bunkers on the course. The green slopes sharply from front to back and the rule is a simple one: never hit the ball above the flag when it is cut in the right half of the green.


The Composite Course – 7th Hole
Par-3
135m / 148y
115m / 126y
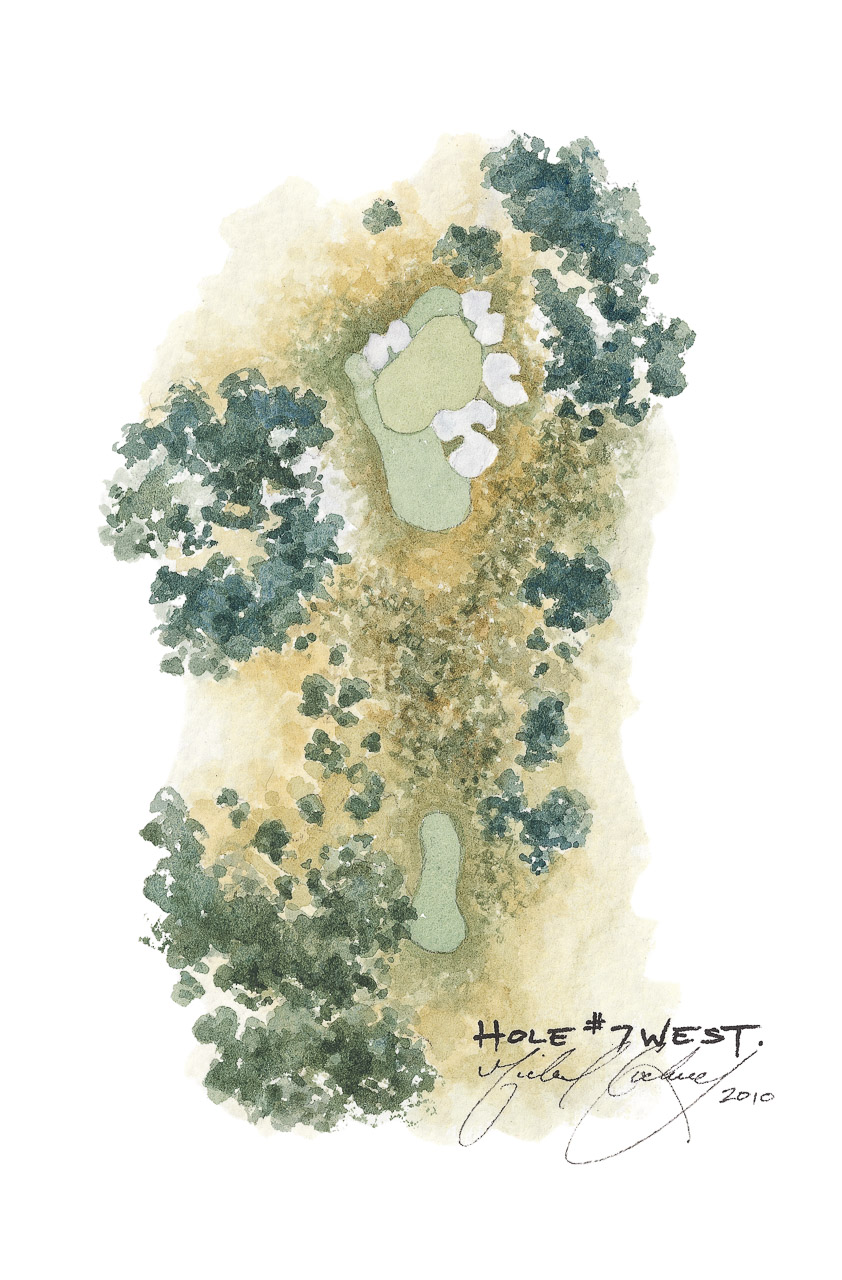
The green on the excellent uphill par-three seventh hole runs across the line of play. The right half of the putting surface is guarded by a deep bunker, which forces players into making a tough decision: do they play left for safety and putt across the long slope, risking a three putt, or aim over the bunker to the small pocket of green where the flattest putts are. Errant shots on this line will be punished.


The Composite Course – 8th
Par-4
285m / 317y
235m / 257y
Off the tee, players are confronted by a multitude of choices of both club and line. The most obvious hazard to avoid is the huge bunker – known to Members as hell’s half-acre – embedded in the left hillside.
From the tee the land drops sharply down, then rises up around the bunker and turns towards a small green at the highest point of the hill. The green is protected by deep bunkers to the right and a swale at the front of the green, which gathers up any pitch shot landing short of the putting surface.


The Composite Course – 9th Hole
Par-4 (Par-5 for Women)
416m / 455y
371m / 406y
The ninth is a long par four that goes downhill then swings uphill from right to left. The ideal place to drive is the left corner of the driving area which is protected by bunkers and tea-tree. Those playing safely to the right will need an exceptional second shot to find the putting surface.
The green tips noticeably to the left from its high point on the right. Players must carry the bunker short and to the right of the green to avoid an awkward length bunker shot.


The Composite Course – 10th Hole
Par-4 (Par-5 for Women)
435m / 476y
417m / 456y
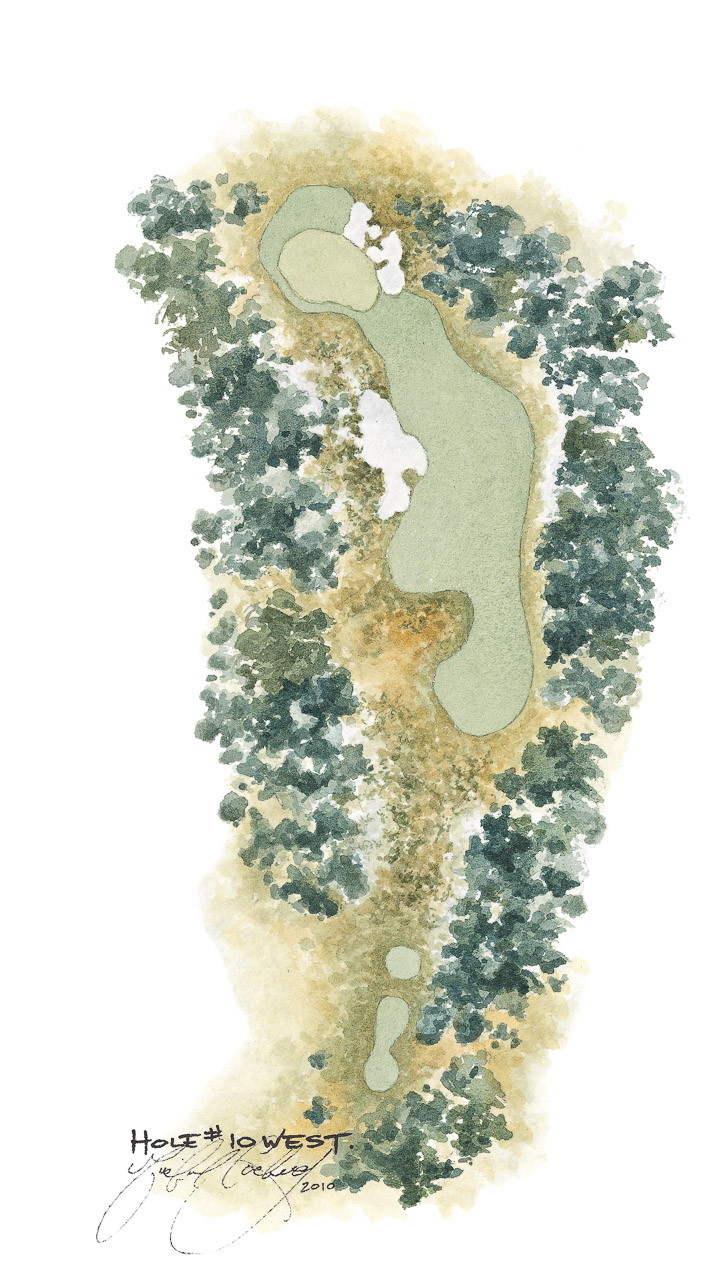
A par five for the Members and par four for the professionals, the tee shot on the twelfth is best suited to a long drive from right to left. The hole turns to the left , and the fairway also tips naturally down from the high point of the land to the right. For the longer hitters the nest of bunkers embedded in the rise of the hill off the tee is the best line off the tee, while there is plenty of room for shorter hitters to the right of the drive bunkers. The cross bunker and the heathland short of the green are the only hazards to be avoided when approaching the green. A small knob on the front left corner of the green can deflect shots to the left, away from the putting surface.
Despite its length the green is one of the smallest on the course and many a player who negotiates the front bunkers watch in horror as their balls roll off the back of the putting surface.


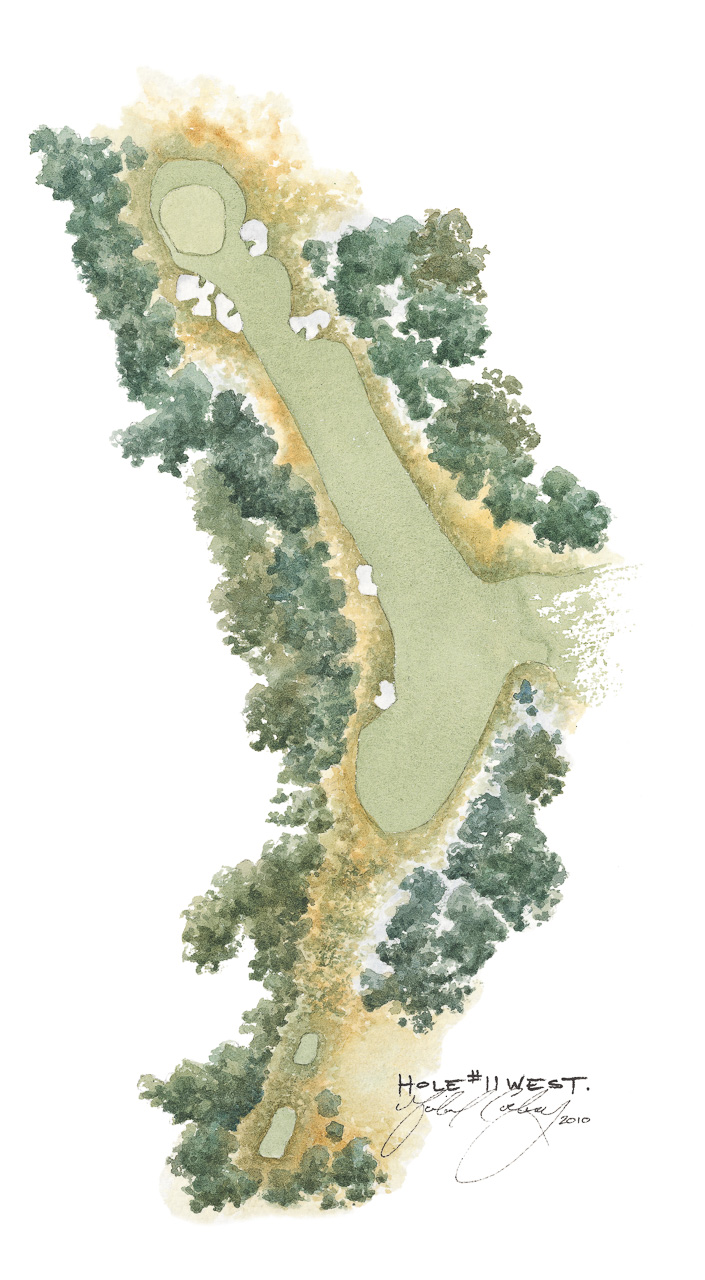
The Composite Course – 11th Hole
Par-4 (Par-5 for Women)
401m / 439y
381m / 417y
The long par-four eleventh is the quintessential strategic dogleg. Two fairway bunkers on the left of the fairway guard the perfect tee shot line to the hole. The first of these is only 150 metres from the tee and the second can only be carried by the longest of hitters. The fairway stretches out wide on the right, but for every metre the ball is pushed to the right off the tee, the approach to the green becomes more difficult.
The second shot is played across a valley up to the green. Players who prefer to run their balls on to the green have ample opportunity to do so.


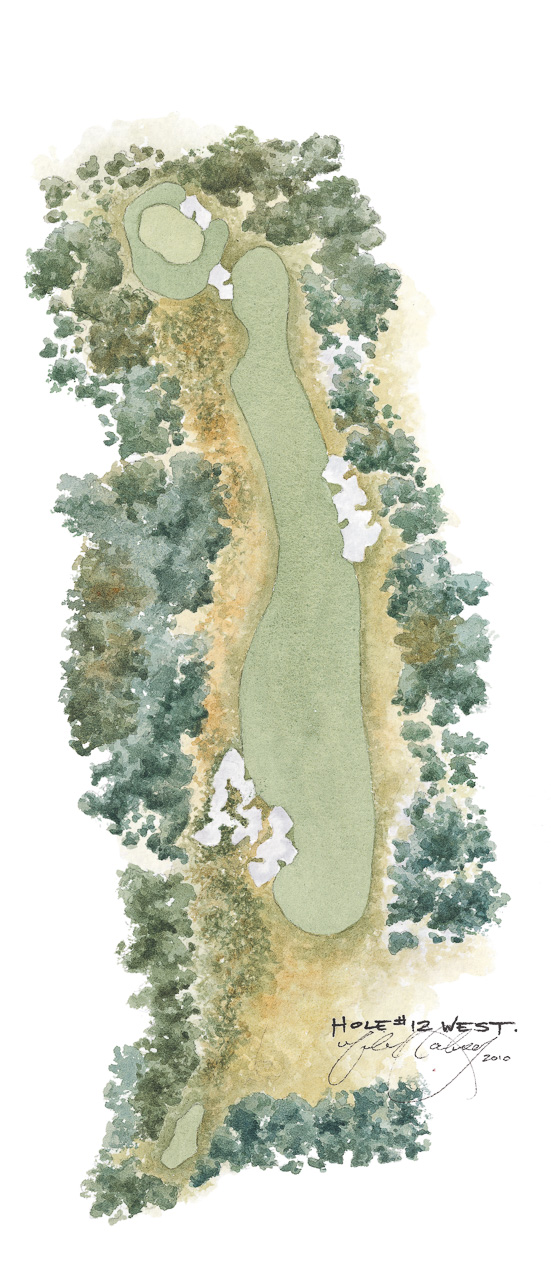
The Composite Course – 12th Hole
Par-4
396m / 433y
355m / 388y
The twelfth hole on the Composite Course is a strong one. The tee shot is blind but the ideal line is clearly defined by the bunker embedded in the hill on the horizon. Stronger players fire far over the sand; those hugging the line of rough down the right inevitably finish closer to green than those driving safely down the left. The fairway tips hard from right to left, almost guaranteeing a lie above your feet for the second shot.
Although bunkers cut across almost the entire length of the approach, they are not hard up against the green. The green itself slopes hard from left to right, which makes it doubly important to leave the approach shot under the hole.


The Composite Course – 13th Hole
Par-4
324m / 354y
285m / 312y
The thirteenth plays over a small hill and down to a green that slopes from noticeably from front back. When the green surface is hard, this is one of the most exacting approach shots on the course. The ideal tee shot flies long down the right side of the fairway so that the approach can be played at right angles to the swale at the front of the green.
The green demands a well struck pitch shot, with a poor pitch invariably sending the ball to the back of the green.


The Composite Course – 14th Hole
Par-5
461m / 504y
368m / 403y
The fourteenth hole is the of three holes which architect Dr Alister MacKenzie designed around a large sand-dune. The tee shot is blind and takes golfers over the sandhill and its famous carry bunkers. Unless one is able to thread the ball between the drive bunkers on the left and tea-tree on the right, the carry is a heroic one for all but the biggest hitters.
If the green is reachable the gamble is worth taking. But bunkers lying short and to the right of the green threaten the miss-hit and must be avoided.


The Composite Course – 15th Hole
Par-4
350m / 383y
316m / 346y
This short two-shotter slides left to right down the hill from the tee. It is short enough to suggest that a long iron from the tee is plenty of club. Those players taking the driver must shape their ball to match the left to right banking of the fairway or risk going into the copse of mana gums. Almost every second shot is played from a down slope and whilst it is an only a short iron, the green is one of the most undulating and challenging on the course. On the green, a hollow feeds down the middle right of the putting surface, separating the front from the back right corner.


The Composite Course – 16th Hole
Par-3
184m / 201y
160m / 175y
The sixteenth is one of the best uphill sort holes in the game. It calls for a controlled draw from the tee, and the further left the pin, the bigger the turn required from right to left if the player is hoping to get close enough to make a three. The front edge of the green runs diagonally from right to left, so the further left the shot, the longer the carry.
The deep front bunker will swallow up shots that fall even a few centimetres short of the putting surface.


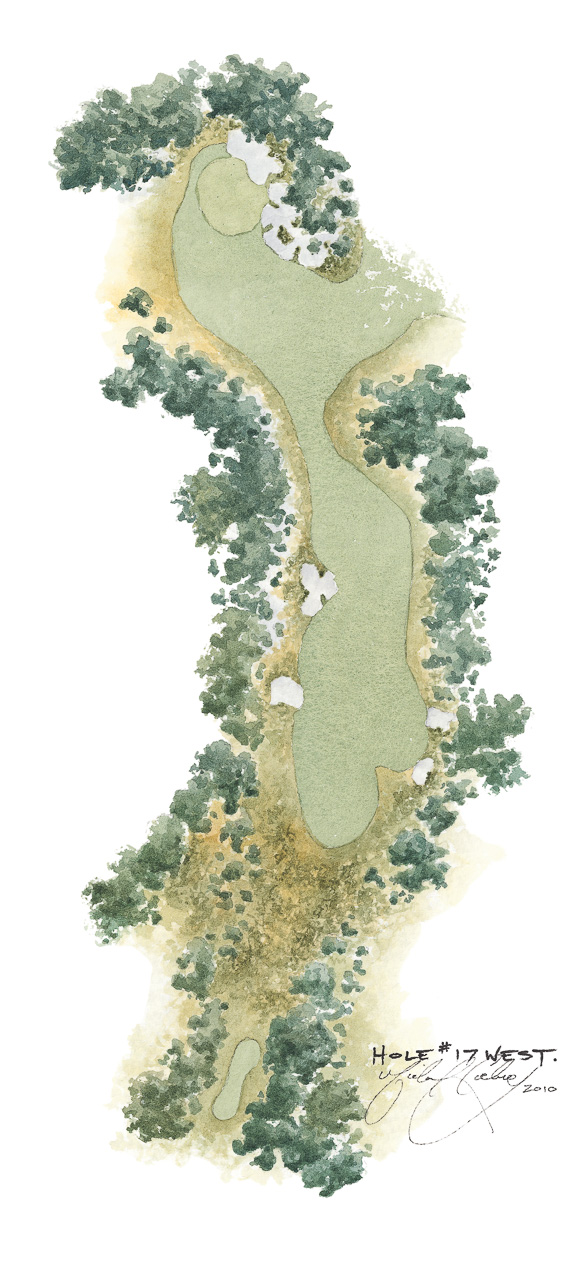
The Composite Course – 17th Hole
Par-5
520m / 568y
423m / 463y
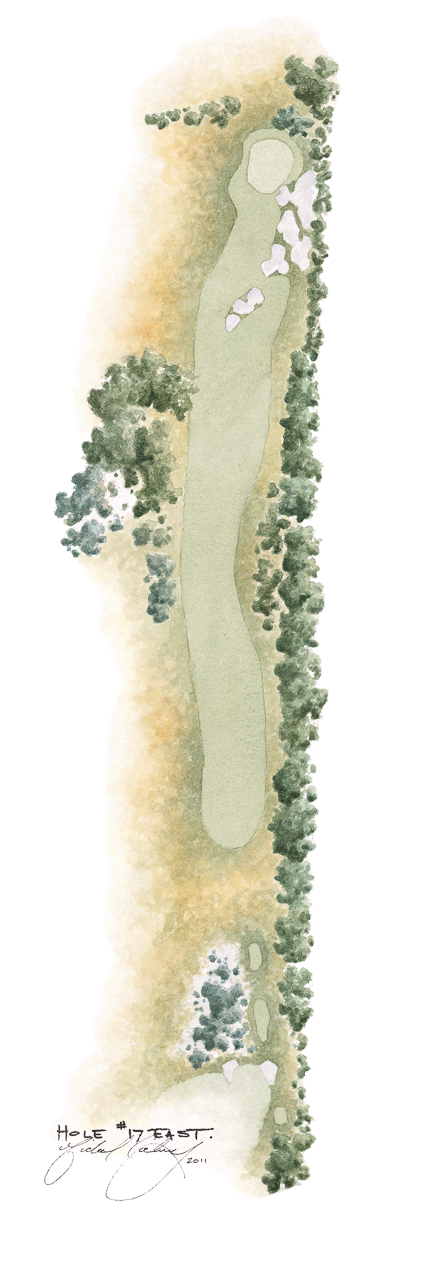
The par five seventeenth is the longest hole on either course. The drive is a relatively simple affair across and down a hill, which makes it all but a blind tee shot. Interest is all in the second shot where there is a multitude of choices for the approach for each standard of golfer. Well placed a diagonal line of bunkers cross the line of the long second shot some 100 metres from the green. Players are faced with a critical decision, play shot for two or attempt to fly the sand and reach the green, or at least the apron.
The green is large and has a subtle valley in the green which starts in the centre and moves to the left.


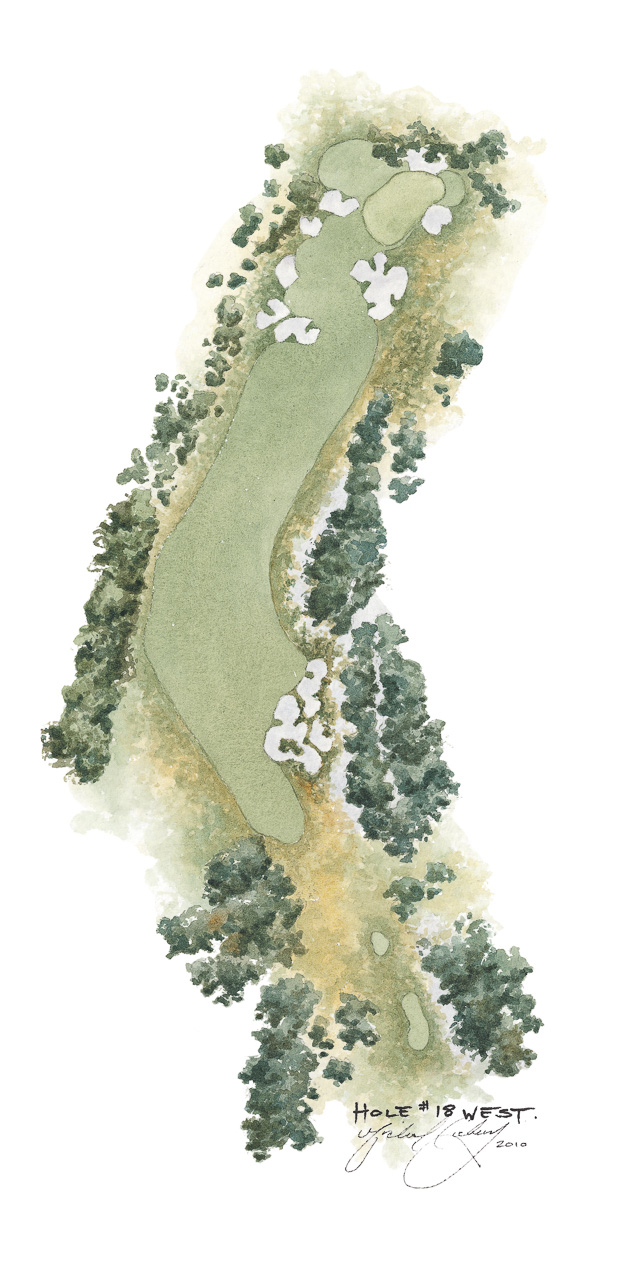
The Composite Course – 18th Hole
Par-4 (Par-5 for Women)
395m / 432y
366m / 400y
The finishing hole on the Composite Course has almost no undulation from tee to green but the angle of approach to the green, especially if the pin is cut in the right half is paramount. The fairway stretches far to the right and has no fairway bunkers. The inside of the dogleg, however, is protected by a clump of tea-tree that guarantees any player that flys their ball to far left are faced with a pitch out at best. It is very easy for the fearful driver to turn what is usually a reasonably easy hole into one that is much more difficult. Apart from a perfectly position drive every approach shot to the large two tiered green will have to carry one of the green side bunkers.
Many a championship has been decided around this eighteenth green, no greater than New South Welshman Billy Dunk who saved par to beat David Graham from the island of heath inside the front left hand bunker. The area is now known as Dunk Island.


Composite Course Scorecard - Blue Tees
Front Nine
| Hole | 1 | 2 | 3 | 4 | 5 | 6 | 7 | 8 | 9 | Out |
|---|---|---|---|---|---|---|---|---|---|---|
| East/West | 1W | 2W | 1E | 2E | 5W | 6W | 7W | 10W | 11W | |
| Blue Tees | 392 | 449 | 304 | 402 | 161 | 391 | 135 | 285 | 416 | 2935 |
| Men’s Par | 4 | 5 | 4 | 4 | 3 | 4 | 3 | 4 | 4 | 35 |
| Women’s Par | 4 | 5 | 4 | 5 | 3 | 5 | 3 | 4 | 5 | 38 |
Back Nine
| Hole | 10 | 11 | 12 | 13 | 14 | 15 | 16 | 17 | 18 | In | Total |
|---|---|---|---|---|---|---|---|---|---|---|---|
| East/West | 12W | 17W | 18W | 3W | 4W | 3E | 4E | 17E | 18E | ||
| Blue Tees | 435 | 401 | 396 | 324 | 461 | 350 | 184 | 520 | 395 | 3466 | 6401 |
| Men’s Par | 4 | 4 | 4 | 4 | 5 | 4 | 3 | 5 | 4 | 37 | 72 |
| Women’s Par | 5 | 5 | 5 | 4 | 5 | 4 | 3 | 5 | 5 | 41 | 79 |
View Composite Course Scorecard - Red Tees
Front Nine
| Hole | 1 | 2 | 3 | 4 | 5 | 6 | 7 | 8 | 9 | Out |
|---|---|---|---|---|---|---|---|---|---|---|
| East/West | 1W | 2W | 1E | 2E | 5W | 6W | 7W | 10W | 11W | |
| Red Tees | 330 | 381 | 283 | 370 | 130 | 337 | 115 | 235 | 371 | 2507 |
| Men’s Par | 4 | 4 | 4 | 4 | 3 | 4 | 3 | 4 | 4 | 34 |
| Women’s Par | 4 | 5 | 4 | 5 | 3 | 4 | 3 | 4 | 5 | 37 |
Back Nine
| Hole | 10 | 11 | 12 | 13 | 14 | 15 | 16 | 17 | 18 | In | Total |
|---|---|---|---|---|---|---|---|---|---|---|---|
| East/West | 12W | 17W | 18W | 3W | 4W | 3E | 4E | 17E | 18E | ||
| Red Tees | 417 | 381 | 355 | 285 | 368 | 316 | 160 | 423 | 366 | 3078 | 5585 |
| Men’s Par | 4 | 4 | 4 | 4 | 5 | 4 | 3 | 5 | 4 | 37 | 71 |
| Women’s Par | 5 | 5 | 4 | 4 | 5 | 4 | 3 | 5 | 5 | 41 | 77 |
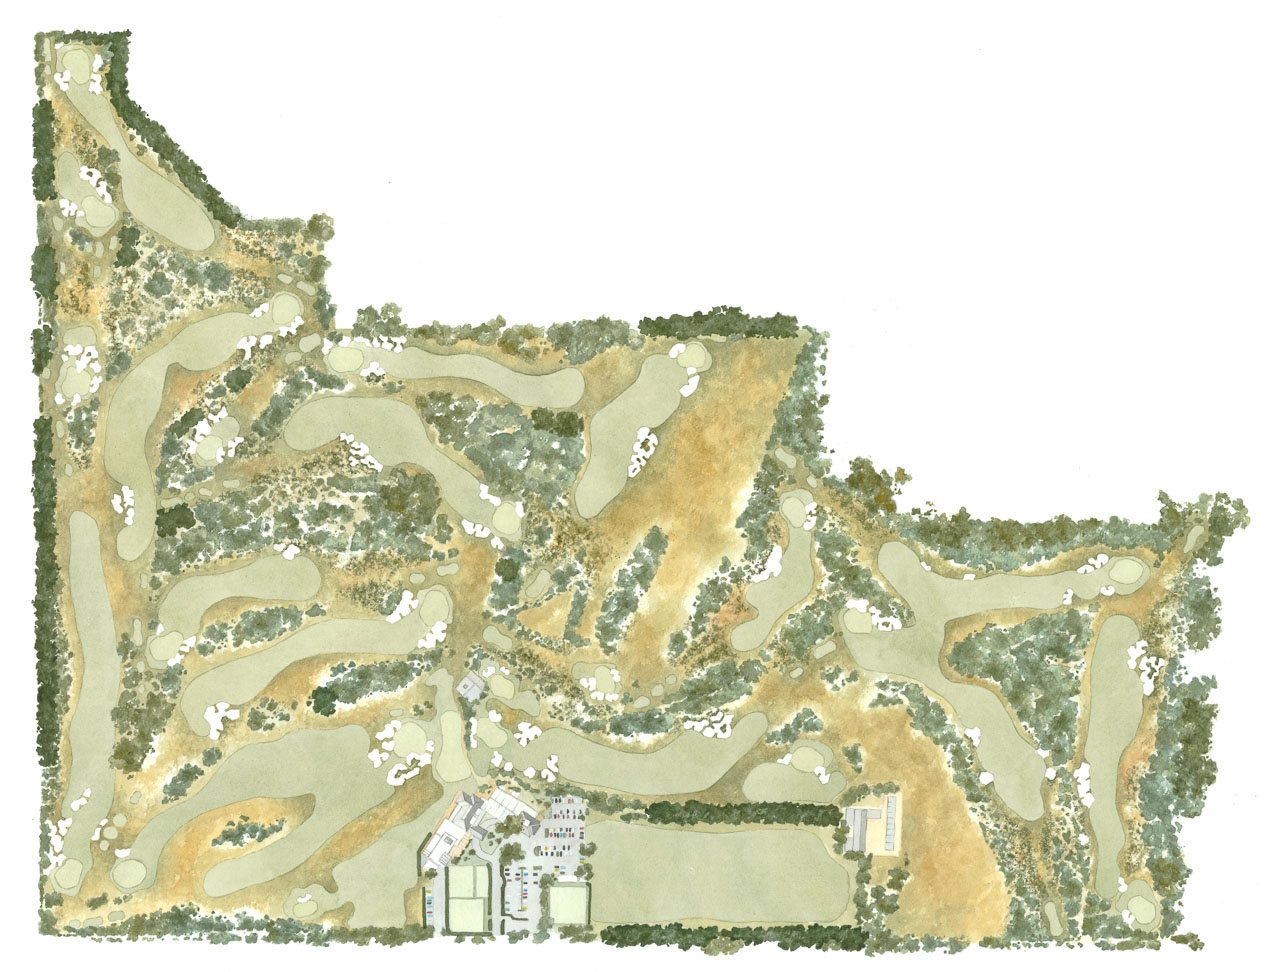
View Composite Course Map
Royal Melbourne Composite Course Map, by Mike Cocking
Numbers indicate the green location for each hole. Hover for hole descriptions.
1
In the fashion of the Old Course at St Andrews, the opening drive on the Composite Course is far from complicated. The fairway is large, but begins to narrow at a point where the longer hitter might reach with a big drive. The green follows the lead of the fairway, unguarded by sand apart from a small bunker on the right, A swale on the front left of the green increases the challenge of the second shot.
2
Once described by West Course record-holder, Tom Crow, as one of the great risk-reward holes, the second hole rewards the player who makes the longest carry from the tee across the right edge of the fairway bunkers which cuts across the fairway on the direct line of the hole. The long second shot is influenced by the distinct slope of the green from right to left. Players who get too aggressive and run through the green face a very fast and difficult return shot.
3
The third hole on the Composite Course is a short two-shotter. The fairway is wide and the bunkers on the right hand side are shared with the eighth hole of the West. There is an option to drive directly over the sand, but the pin position on the small fearsome green will dictate the strategy. The deep bunker protecting the front right hand corner of the green must be avoided as saving par from this position is near impossible. From this high point, the green tilts steeply down to the bottom left hand corner.
4
The fourth is one of the narrowest and most dangerous driving holes on the course. Most of the view of the right half of the fairway from the tee is obscured, resulting in uncertainty as to the precise driving line. The second shot plays steeply up to and long and narrow two tiered green. Whilst there are no fairway bunkers on this hole, seven bunkers flank the green on both the left and right hand sides. A well judged second shot is required here as ninety per cent of shots finish up well short.
5
The fifth is the first one-shotter on the Composite Course. It is one of the best par threes in Melbourne, which makes it one of the best in the world. The hole plays down from the tee, across a valley and up to a green sitting on the opposite hill. The key aim in playing the fifth is to get the ball up onto the putting surface; anything short is swept back down the bank fronting the green. Anything too long leaves a treacherous downhill putt.
6
The sixth hole is one of the great two-shot holes, a wonderful example of how to perfectly position a ground hazard on the inside corner of a dogleg. The tee shot is played over a magnificent expanse of heath and sand. The player must then make a decision whether to attempt to carry over the bunkers at the corner of the dogleg, or to opt for discretion and hit further to the left. A long drive over the bunkers to the far edge of the fairway leaves a difficult second shot over one of the most awkward greenside bunkers on the course. The green slopes sharply from front to back and the rule is a simple one: never hit the ball above the flag when it is cut in the right half of the green.
7
The green on the excellent uphill par-three seventh hole runs across the line of play. The right half of the putting surface is guarded by a deep bunker, which forces players into making a tough decision: do they play left for safety and putt across the long slope, risking a three putt, or aim over the bunker to the small pocket of green where the flattest putts are. Errant shots on this line will be punished.
8
Off the tee, players are confronted by a multitude of choices of both club and line. The most obvious hazard to avoid is the huge bunker – known to Members as hell’s half-acre – embedded in the left hillside. From the tee the land drops sharply down, then rises up around the bunker and turns towards a small green at the highest point of the hill. The green is protected by deep bunkers to the right and a swale at the front of the green, which gathers up any pitch shot landing short of the putting surface.
9
The ninth is a long par four that goes downhill then swings uphill from right to left. The ideal place to drive is the left corner of the driving area which is protected by bunkers and tea-tree. Those playing safely to the right will need an exceptional second shot to find the putting surface. The green tips noticeably to the left from its high point on the right. Players must carry the bunker short and to the right of the green to avoid an awkward length bunker shot.
10
A par five for the Members and par four for the professionals, the tee shot on the twelfth is best suited to a long drive from right to left. The hole turns to the left , and the fairway also tips naturally down from the high point of the land to the right. For the longer hitters the nest of bunkers embedded in the rise of the hill off the tee is the best line off the tee, while there is plenty of room for shorter hitters to the right of the drive bunkers. The cross bunker and the heathland short of the green are the only hazards to be avoided when approaching the green. A small knob on the front left corner of the green can deflect shots to the left, away from the putting surface. Despite its length the green is one of the smallest on the course and many a player who negotiates the front bunkers watch in horror as their balls roll off the back of the putting surface.
11
The long par-four eleventh is the quintessential strategic dogleg. Two fairway bunkers on the left of the fairway guard the perfect tee shot line to the hole. The first of these is only 150 metres from the tee and the second can only be carried by the longest of hitters. The fairway stretches out wide on the right, but for every metre the ball is pushed to the right off the tee, the approach to the green becomes more difficult. The second shot is played across a valley up to the green. Players who prefer to run their balls on to the green have ample opportunity to do so.
12
The twelfth hole on the Composite Course is a strong one. The tee shot is blind but the ideal line is clearly defined by the bunker embedded in the hill on the horizon. Stronger players fire far over the sand; those hugging the line of rough down the right inevitably finish closer to green than those driving safely down the left. The fairway tips hard from right to left, almost guaranteeing a lie above your feet for the second shot. Although bunkers cut across almost the entire length of the approach, they are not hard up against the green. The green itself slopes hard from left to right, which makes it doubly important to leave the approach shot under the hole.
13
The thirteenth plays over a small hill and down to a green that slopes from noticeably from front back. When the green surface is hard, this is one of the most exacting approach shots on the course. The ideal tee shot flies long down the right side of the fairway so that the approach can be played at right angles to the swale at the front of the green. The green demands a well struck pitch shot, with a poor pitch invariably sending the ball to the back of the green.
14
The fourteenth hole is the of three holes which architect Dr Alister MacKenzie designed around a large sand-dune. The tee shot is blind and takes golfers over the sandhill and its famous carry bunkers. Unless one is able to thread the ball between the drive bunkers on the left and tea-tree on the right, the carry is a heroic one for all but the biggest hitters. If the green is reachable the gamble is worth taking. But bunkers lying short and to the right of the green threaten the miss-hit and must be avoided.
15
This short two-shotter slides left to right down the hill from the tee. It is short enough to suggest that a long iron from the tee is plenty of club. Those players taking the driver must shape their ball to match the left to right banking of the fairway or risk going into the copse of mana gums. Almost every second shot is played from a down slope and whilst it is an only a short iron, the green is one of the most undulating and challenging on the course. On the green, a hollow feeds down the middle right of the putting surface, separating the front from the back right corner.
16
The sixteenth is one of the best uphill sort holes in the game. It calls for a controlled draw from the tee, and the further left the pin, the bigger the turn required from right to left if the player is hoping to get close enough to make a three. The front edge of the green runs diagonally from right to left, so the further left the shot, the longer the carry. The deep front bunker will swallow up shots that fall even a few centimetres short of the putting surface.
17
The par five seventeenth is the longest hole on either course. The drive is a relatively simple affair across and down a hill, which makes it all but a blind tee shot. Interest is all in the second shot where there is a multitude of choices for the approach for each standard of golfer. Well placed a diagonal line of bunkers cross the line of the long second shot some 100 metres from the green. Players are faced with a critical decision, play shot for two or attempt to fly the sand and reach the green, or at least the apron. The green is large and has a subtle valley in the green which starts in the centre and moves to the left.
18
The finishing hole on the Composite Course has almost no undulation from tee to green but the angle of approach to the green, especially if the pin is cut in the right half is paramount. The fairway stretches far to the right and has no fairway bunkers. The inside of the dogleg, however, is protected by a clump of tea-tree that guarantees any player that flys their ball to far left are faced with a pitch out at best. It is very easy for the fearful driver to turn what is usually a reasonably easy hole into one that is much more difficult. Apart from a perfectly position drive every approach shot to the large two tiered green will have to carry one of the green side bunkers. Many a championship has been decided around this eighteenth green, no greater than New South Welshman Billy Dunk who saved par to beat David Graham from the island of heath inside the front left hand bunker. The area is now known as Dunk Island.
The Composite Course Breakdown
The Composite Course – 1st Hole
Par-4
392m / 429y
330m / 361y
In the fashion of the Old Course at St Andrews, the opening drive on the Composite Course is far from complicated. The fairway is large, but begins to narrow at a point where the longer hitter might reach with a big drive. The green follows the lead of the fairway, unguarded by sand apart from a small bunker on the right, A swale on the front left of the green increases the challenge of the second shot.


The Composite Course – 2nd Hole
Par-5
449m / 491y
381m / 417y
Once described by West Course record-holder, Tom Crow, as one of the great risk-reward holes, the second hole rewards the player who makes the longest carry from the tee across the right edge of the fairway bunkers which cuts across the fairway on the direct line of the hole. The long second shot is influenced by the distinct slope of the green from right to left. Players who get too aggressive and run through the green face a very fast and difficult return shot.


The Composite Course – 3rd Hole
Par-4
304m / 333y
283m / 310y
The third hole on the Composite Course is a short two-shotter. The fairway is wide and the bunkers on the right hand side are shared with the eighth hole of the West.
There is an option to drive directly over the sand, but the pin position on the small fearsome green will dictate the strategy. The deep bunker protecting the front right hand corner of the green must be avoided as saving par from this position is near impossible. From this high point, the green tilts steeply down to the bottom left hand corner.


The Composite Course – 4th Hole
Par-4 (Par-5 for Women)
402m / 440y
370m / 405y
The fourth is one of the narrowest and most dangerous driving holes on the course. Most of the view of the right half of the fairway from the tee is obscured, resulting in uncertainty as to the precise driving line.
The second shot plays steeply up to and long and narrow two tiered green. Whilst there are no fairway bunkers on this hole, seven bunkers flank the green on both the left and right hand sides. A well judged second shot is required here as ninety per cent of shots finish up well short.


The Composite Course – 5th Hole
Par-4
161m / 176y
130m / 142y
The fifth is the first one-shotter on the Composite Course. It is one of the best par threes in Melbourne, which makes it one of the best in the world. The hole plays down from the tee, across a valley and up to a green sitting on the opposite hill. The key aim in playing the fifth is to get the ball up onto the putting surface; anything short is swept back down the bank fronting the green. Anything too long leaves a treacherous downhill putt.


The Composite Course – 6th Hole
Par-4
391m / 428y
337m / 369y
The sixth hole is one of the great two-shot holes, a wonderful example of how to perfectly position a ground hazard on the inside corner of a dogleg. The tee shot is played over a magnificent expanse of heath and sand. The player must then make a decision whether to attempt to carry over the bunkers at the corner of the dogleg, or to opt for discretion and hit further to the left.
A long drive over the bunkers to the far edge of the fairway leaves a difficult second shot over one of the most awkward greenside bunkers on the course. The green slopes sharply from front to back and the rule is a simple one: never hit the ball above the flag when it is cut in the right half of the green.


The Composite Course – 7th Hole
Par-3
135m / 148y
115m / 126y
The green on the excellent uphill par-three seventh hole runs across the line of play. The right half of the putting surface is guarded by a deep bunker, which forces players into making a tough decision: do they play left for safety and putt across the long slope, risking a three putt, or aim over the bunker to the small pocket of green where the flattest putts are. Errant shots on this line will be punished.


The Composite Course – 8th
Par-4
285m / 317y
235m / 257y
Off the tee, players are confronted by a multitude of choices of both club and line. The most obvious hazard to avoid is the huge bunker – known to Members as hell’s half-acre – embedded in the left hillside.
From the tee the land drops sharply down, then rises up around the bunker and turns towards a small green at the highest point of the hill. The green is protected by deep bunkers to the right and a swale at the front of the green, which gathers up any pitch shot landing short of the putting surface.


The Composite Course – 9th Hole
Par-4 (Par-5 for Women)
416m / 455y
371m / 406y
The ninth is a long par four that goes downhill then swings uphill from right to left. The ideal place to drive is the left corner of the driving area which is protected by bunkers and tea-tree. Those playing safely to the right will need an exceptional second shot to find the putting surface.
The green tips noticeably to the left from its high point on the right. Players must carry the bunker short and to the right of the green to avoid an awkward length bunker shot.


The Composite Course – 10th Hole
Par-4 (Par-5 for Women)
435m / 476y
417m / 456y
A par five for the Members and par four for the professionals, the tee shot on the twelfth is best suited to a long drive from right to left. The hole turns to the left , and the fairway also tips naturally down from the high point of the land to the right. For the longer hitters the nest of bunkers embedded in the rise of the hill off the tee is the best line off the tee, while there is plenty of room for shorter hitters to the right of the drive bunkers. The cross bunker and the heathland short of the green are the only hazards to be avoided when approaching the green. A small knob on the front left corner of the green can deflect shots to the left, away from the putting surface.
Despite its length the green is one of the smallest on the course and many a player who negotiates the front bunkers watch in horror as their balls roll off the back of the putting surface.


The Composite Course – 11th Hole
Par-4 (Par-5 for Women)
401m / 439y
381m / 417y
The long par-four eleventh is the quintessential strategic dogleg. Two fairway bunkers on the left of the fairway guard the perfect tee shot line to the hole. The first of these is only 150 metres from the tee and the second can only be carried by the longest of hitters. The fairway stretches out wide on the right, but for every metre the ball is pushed to the right off the tee, the approach to the green becomes more difficult.
The second shot is played across a valley up to the green. Players who prefer to run their balls on to the green have ample opportunity to do so.


The Composite Course – 12th Hole
Par-4
396m / 433y
355m / 388y
The twelfth hole on the Composite Course is a strong one. The tee shot is blind but the ideal line is clearly defined by the bunker embedded in the hill on the horizon. Stronger players fire far over the sand; those hugging the line of rough down the right inevitably finish closer to green than those driving safely down the left. The fairway tips hard from right to left, almost guaranteeing a lie above your feet for the second shot.
Although bunkers cut across almost the entire length of the approach, they are not hard up against the green. The green itself slopes hard from left to right, which makes it doubly important to leave the approach shot under the hole.


The Composite Course – 13th Hole
Par-4
324m / 354y
285m / 312y
The thirteenth plays over a small hill and down to a green that slopes from noticeably from front back. When the green surface is hard, this is one of the most exacting approach shots on the course. The ideal tee shot flies long down the right side of the fairway so that the approach can be played at right angles to the swale at the front of the green.
The green demands a well struck pitch shot, with a poor pitch invariably sending the ball to the back of the green.


The Composite Course – 14th Hole
Par-5
461m / 504y
368m / 403y
The fourteenth hole is the of three holes which architect Dr Alister MacKenzie designed around a large sand-dune. The tee shot is blind and takes golfers over the sandhill and its famous carry bunkers. Unless one is able to thread the ball between the drive bunkers on the left and tea-tree on the right, the carry is a heroic one for all but the biggest hitters.
If the green is reachable the gamble is worth taking. But bunkers lying short and to the right of the green threaten the miss-hit and must be avoided.


The Composite Course – 15th Hole
Par-4
350m / 383y
316m / 346y
This short two-shotter slides left to right down the hill from the tee. It is short enough to suggest that a long iron from the tee is plenty of club. Those players taking the driver must shape their ball to match the left to right banking of the fairway or risk going into the copse of mana gums. Almost every second shot is played from a down slope and whilst it is an only a short iron, the green is one of the most undulating and challenging on the course. On the green, a hollow feeds down the middle right of the putting surface, separating the front from the back right corner.
The Composite Course – 16th Hole
Par-3
184m / 201y
160m / 175y
The sixteenth is one of the best uphill sort holes in the game. It calls for a controlled draw from the tee, and the further left the pin, the bigger the turn required from right to left if the player is hoping to get close enough to make a three. The front edge of the green runs diagonally from right to left, so the further left the shot, the longer the carry.
The deep front bunker will swallow up shots that fall even a few centimetres short of the putting surface.


The Composite Course – 17th Hole
Par-5
520m / 568y
423m / 463y
The par five seventeenth is the longest hole on either course. The drive is a relatively simple affair across and down a hill, which makes it all but a blind tee shot. Interest is all in the second shot where there is a multitude of choices for the approach for each standard of golfer. Well placed a diagonal line of bunkers cross the line of the long second shot some 100 metres from the green. Players are faced with a critical decision, play shot for two or attempt to fly the sand and reach the green, or at least the apron.
The green is large and has a subtle valley in the green which starts in the centre and moves to the left.


The Composite Course – 18th Hole
Par-4 (Par-5 for Women)
395m / 432y
366m / 400y
The finishing hole on the Composite Course has almost no undulation from tee to green but the angle of approach to the green, especially if the pin is cut in the right half is paramount. The fairway stretches far to the right and has no fairway bunkers. The inside of the dogleg, however, is protected by a clump of tea-tree that guarantees any player that flys their ball to far left are faced with a pitch out at best. It is very easy for the fearful driver to turn what is usually a reasonably easy hole into one that is much more difficult. Apart from a perfectly position drive every approach shot to the large two tiered green will have to carry one of the green side bunkers.
Many a championship has been decided around this eighteenth green, no greater than New South Welshman Billy Dunk who saved par to beat David Graham from the island of heath inside the front left hand bunker. The area is now known as Dunk Island.


The Royal Melbourne
Golf Club
Cheltenham Road, Black Rock
Victoria, Australia 3193
Contact Us
+61 3 9599 0500
rmgc@royal.melbourne
