
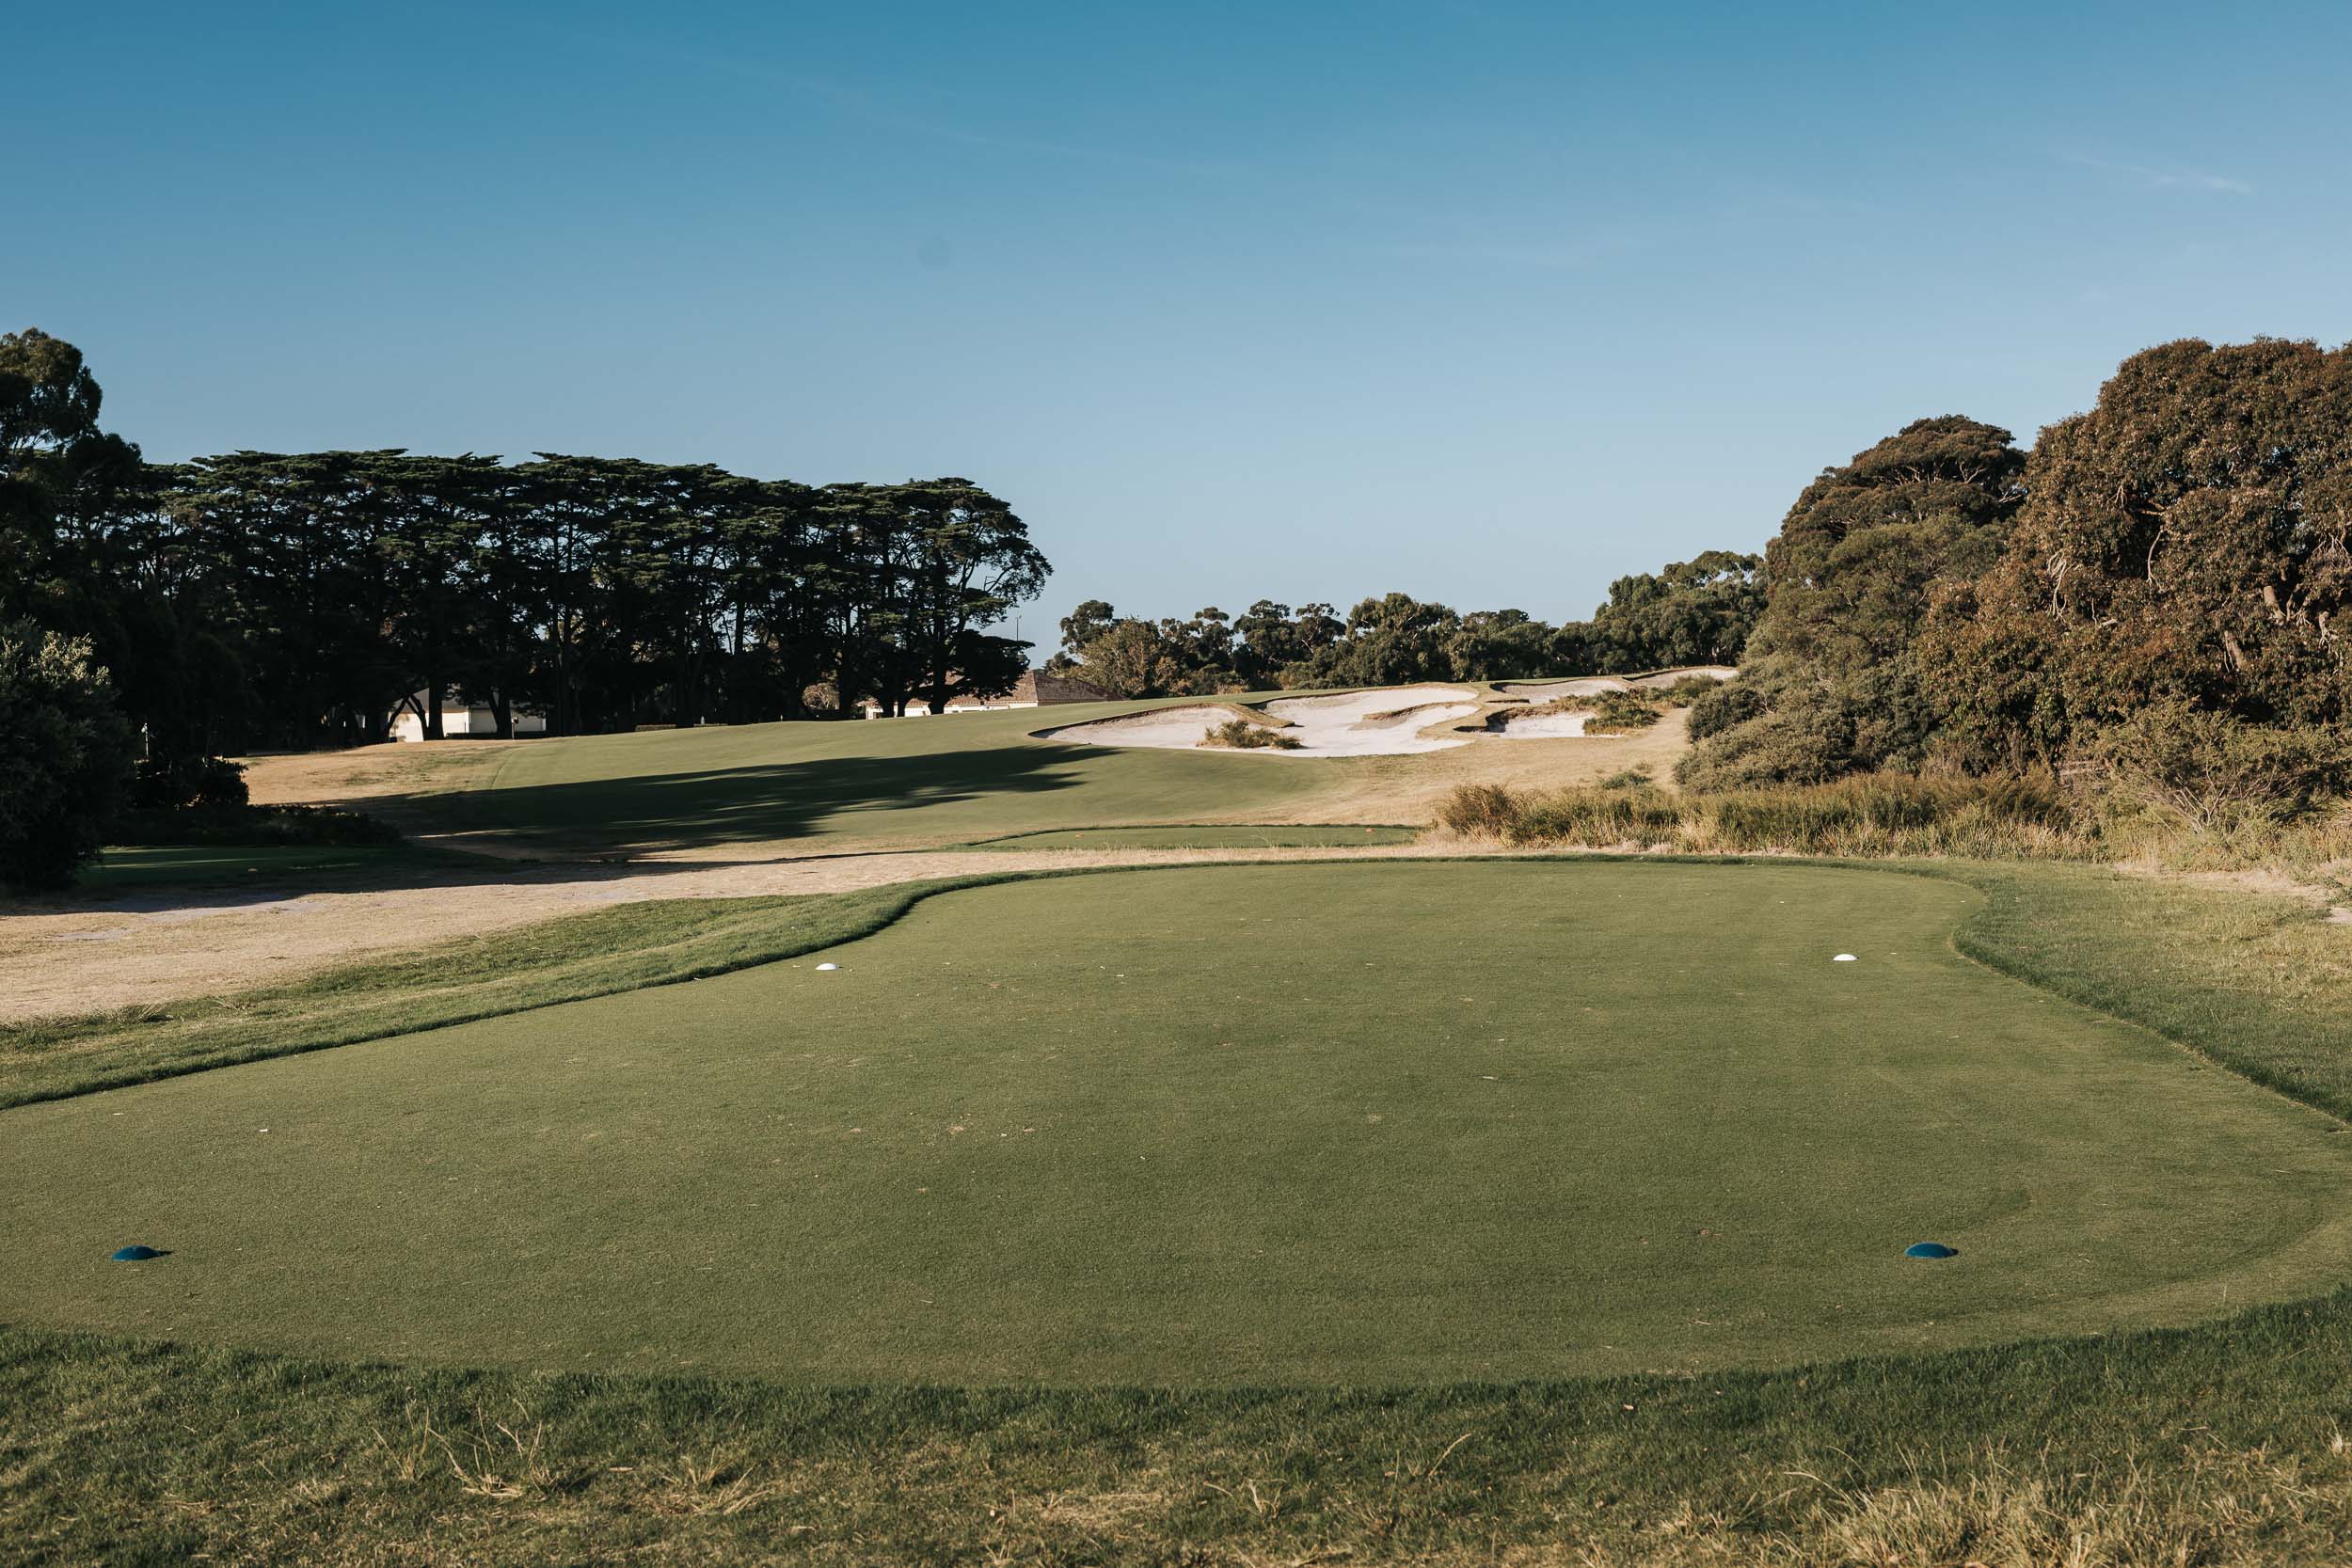
About the Course
Much has been written about the qualities of the West Course but, put simply, its beauty is down to a combination of wonderful topography, great design and imaginative construction.
West Course highlights include dramatic undulations, a natural rugged appearance and bold bunkering – while the rough areas around the tees and bunkers are a mix of native grasses which naturally frame each hole. The greens are perhaps its signature feature and for decades have consistently provided the finest putting surfaces in Australia. They are large and beautifully contoured and built to accommodate approaches from a number of angles with each progressively more difficult the further the tee shot strays from the perfect line.
Dr. Alister MacKenzie’s 1926 routing fits snuggly into the contours of the rolling sandbelt land. His greens are miniature versions of the surrounding topography. His crisp bunkering, with vertical edges a foot or more tall, chew into fairways and putting surfaces. Most holes dogleg, so distance means nothing and angle into the pin is everything.
Royal Melbourne’s West Course has long been ranked No. 1 in Australia and among the top 10 golf courses in the world.
The West Course feature video
The West Course Breakdown
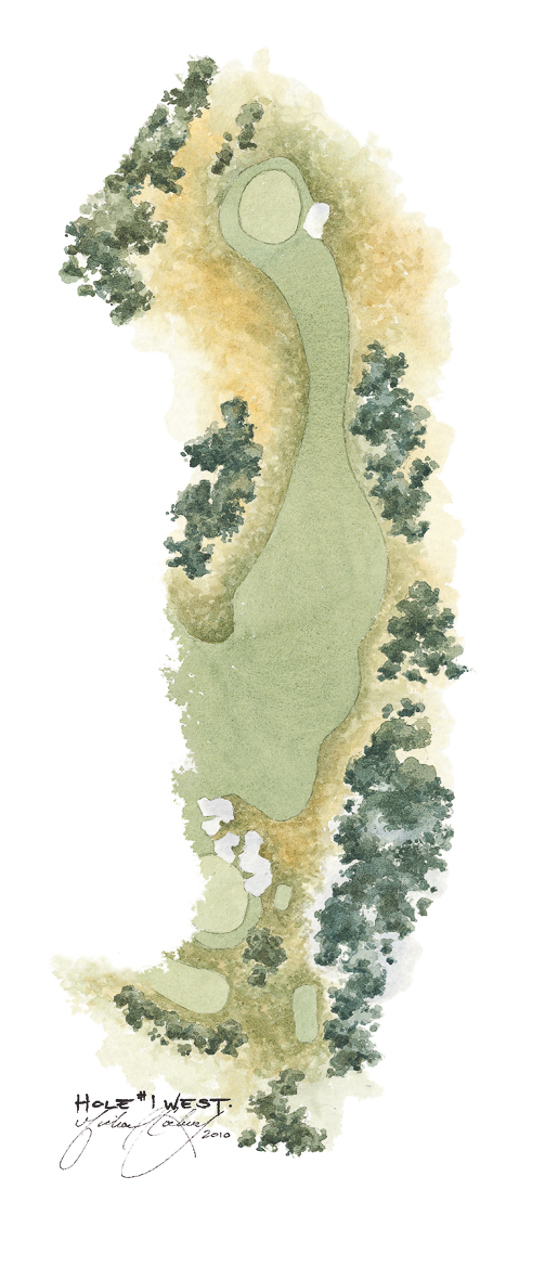
The West Course – 1st Hole
Par-4
392m / 429y
330m / 361y
In the fashion of the Old Course at St Andrews, the opening drive on the West Course is far from complicated. The fairway is large, but begins to narrow at a point where the longer hitter might reach with a big drive. The green follows the lead of the fairway, unguarded by sand apart from a small bunker on the right. A swale on the front left of the green increases the challenge of the second shot, which must be kept below the hole to allow for any kind of aggression on your opening putt.


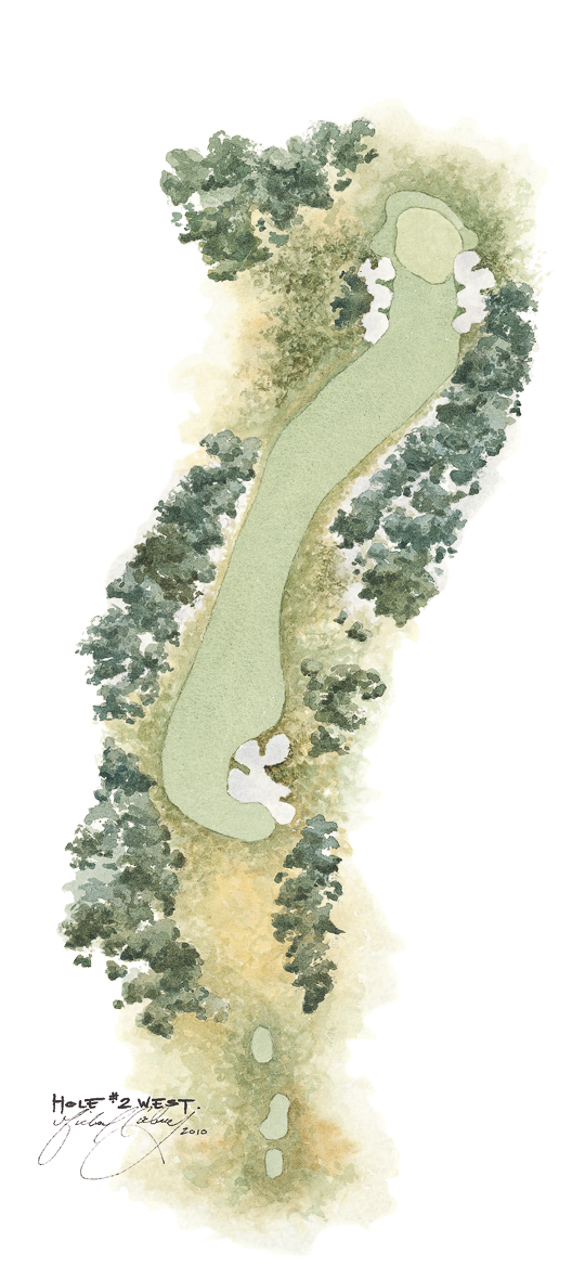
The West Course – 2nd Hole
Par-5
449m / 491y
381m / 417y
Once described by West Course record-holder, Tom Crow, as one of the great risk-reward holes, the second hole rewards the player who makes the longest carry from the tee across the right edge of the fairway bunkers which cuts across the fairway on the direct line of the hole. The long second shot is influenced by the distinct slope of the green from right to left. Players who get too aggressive and run through the green face a very fast and difficult return shot.


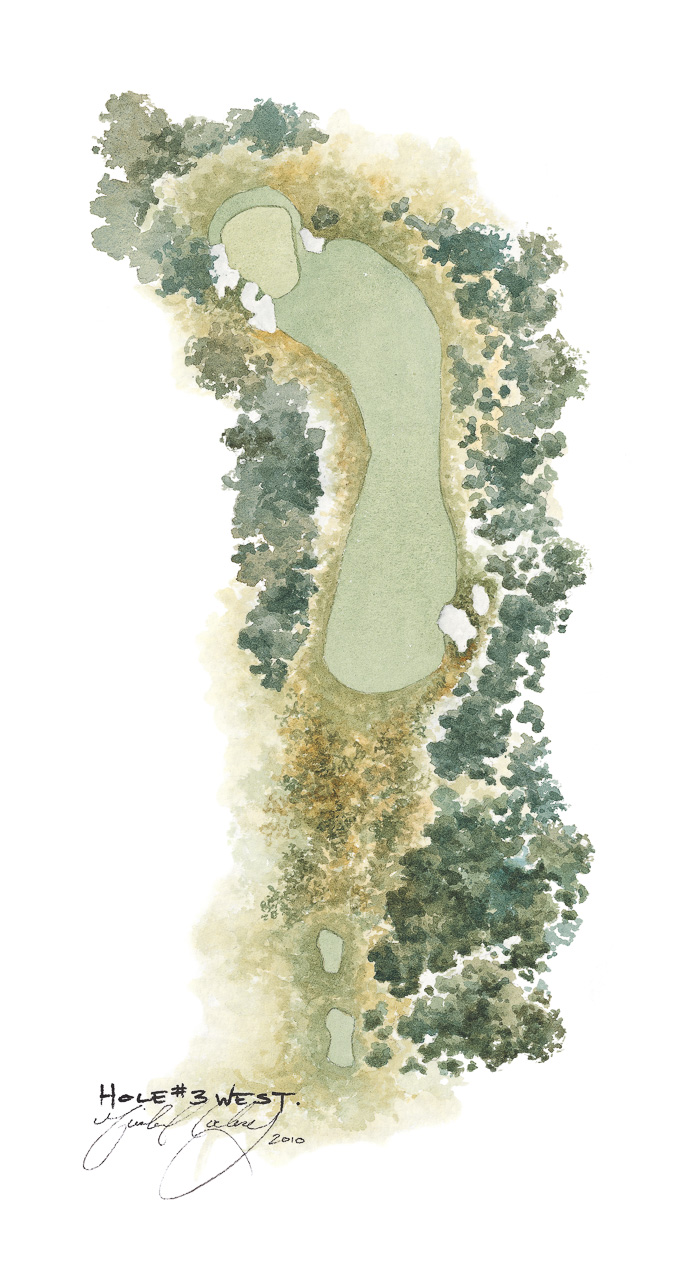
The West Course – 3rd Hole
Par-4
324m / 354y
285m / 312y
The third plays over a small hill and down to a green that slopes noticeably from front to back. When the green surface is hard, this is one of the most exacting approach shots on the course. The ideal tee shot flies long down the right side of the fairway so that the approach can be played at right angles to the swale at the front of the green. The green demands a well struck pitch shot, with a poor pitch invariably sending the ball to the back of the green.


The West Course – 4th Hole
Par-5
461m / 507y
368m / 403y
The fourth hole is one of three holes which architect Dr Alister MacKenzie designed around a large sand-dune. The tee shot is blind and takes golfers over the sandhill and its famous carry bunkers. Unless one is able to thread the ball between the drive bunkers on the left and tea-tree on the right, the carry is a heroic one for all but the biggest hitters. If the green is reachable the gamble is worth taking. But bunkers lying short and to the right of the green threaten the mishit and must be avoided.


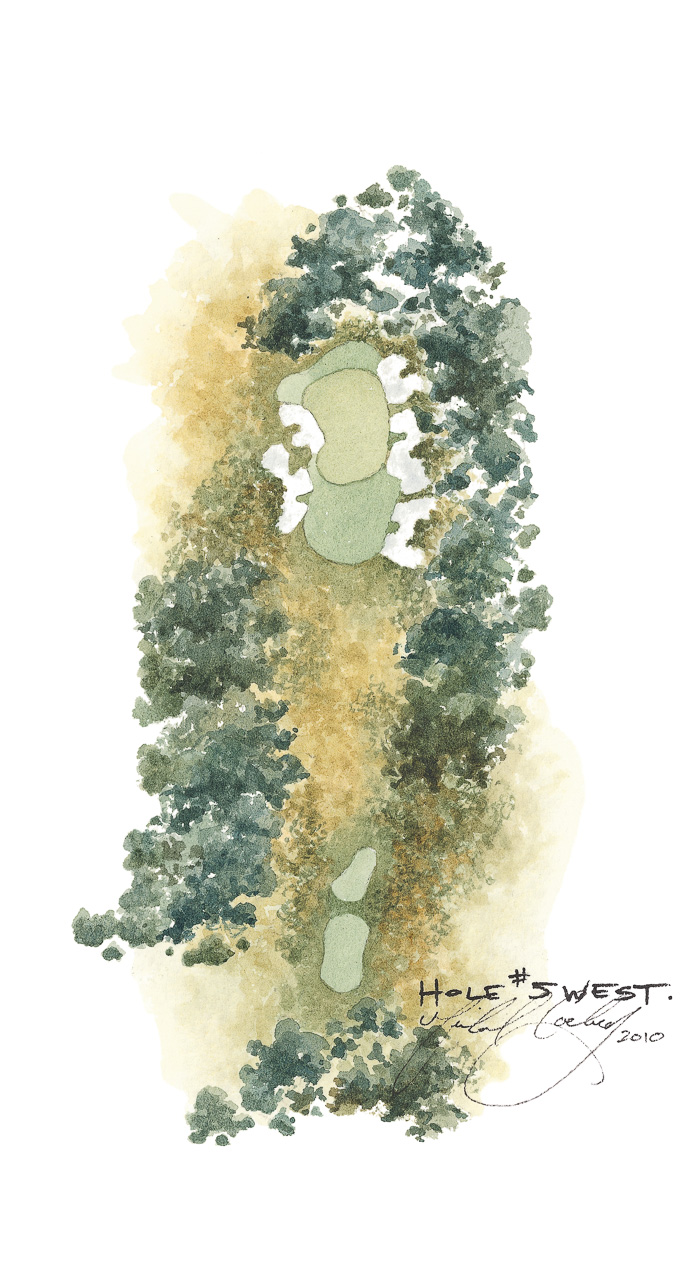
The West Course – 5th Hole
Par-3
161m / 176y
130m / 142y
The fifth is the first one-shotter on the West Course. It is one of the best par threes in Melbourne, which makes it one of the best in the world. The hole plays down from the tee, across a valley and up to a green sitting on the opposite hill. The key aim in playing the fifth is to get the ball up onto the putting surface; anything short is swept back down the bank fronting the green. Anything too long leaves a treacherous downhill putt.


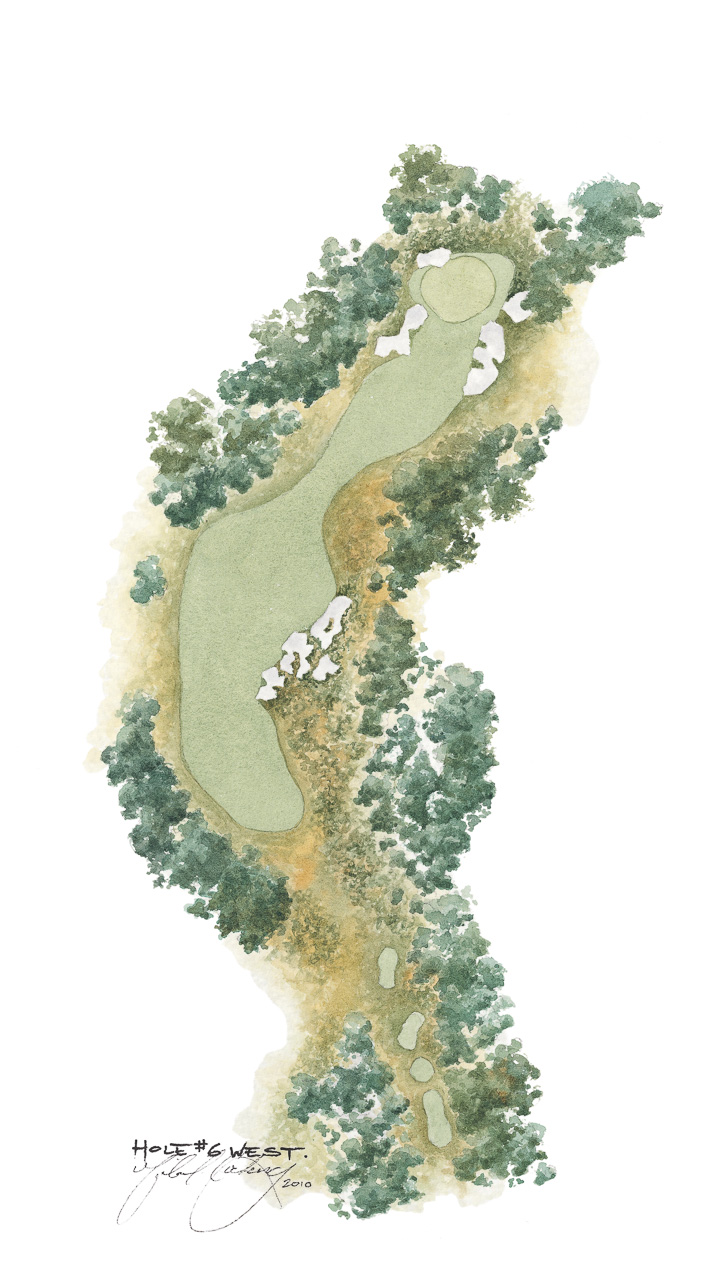
The West Course – 6th Hole
Par-4
391m / 428y
337m / 369y
The sixth hole is one of the great two-shot holes, a wonderful example of how to perfectly position a ground hazard on the inside corner of a dogleg. The tee shot is played over a magnificent expanse of heath and sand. The player must then make a decision whether to attempt to carry over the bunkers at the corner of the dogleg, or to opt for discretion and hit further to the left. A long drive over the bunkers to the far edge of the fairway leaves a difficult second shot over one of the most awkward greenside bunkers on the course. The green slopes sharply from front to back and the rule is a simple one: never hit the ball above the flag when it is cut in the right half of the green.


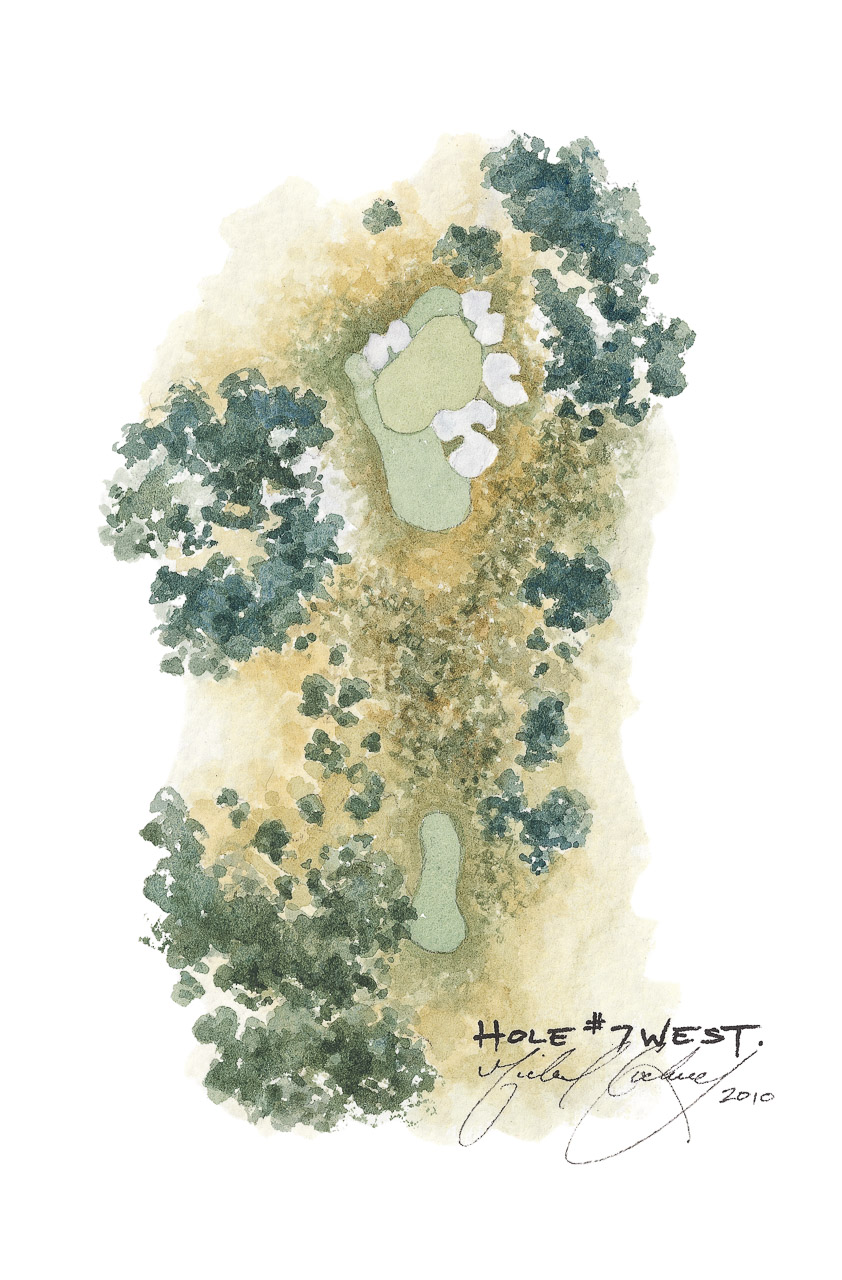
The West Course – 7th Hole
Par-3
135m / 148y
115m / 126y
The green on the excellent uphill par-three seventh hole runs across the line of play. The right half of the putting surface is guarded by a deep bunker, which forces players into making a tough decision: do they play left for safety and putt across the long slope, risking a three putt, or aim over the bunker to the small pocket of green where the flattest putts are. Errant shots on this line will be punished.


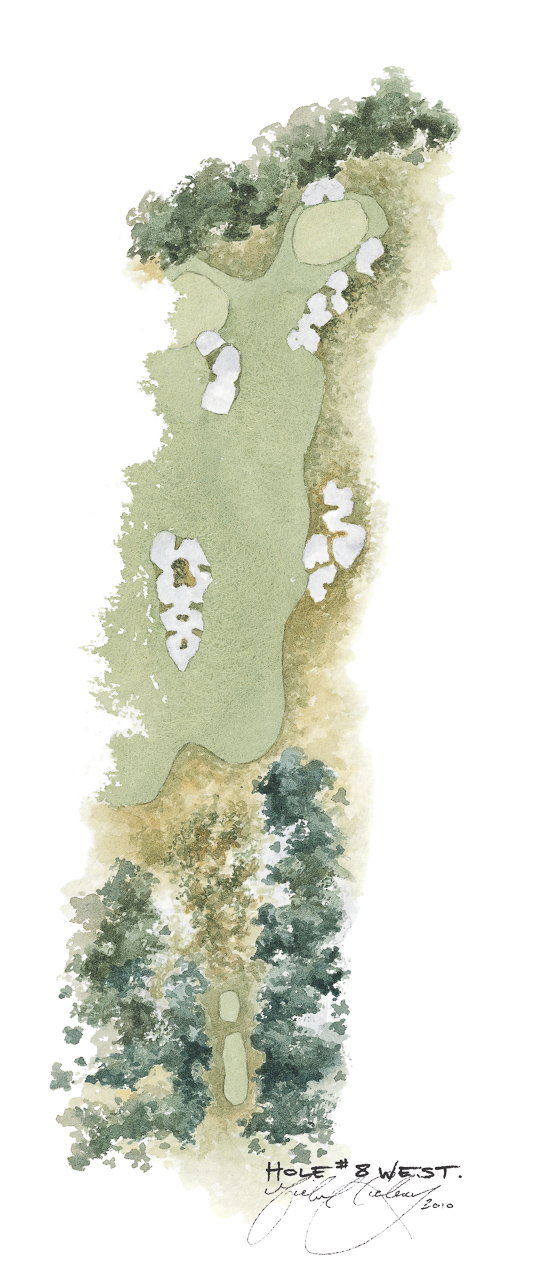
The West Course – 8th
Par-4
346m / 379y
312m / 341y
The eighth is a short par four where most players would expect to approach the green with a short to mid iron. The bunkers on the left – which contain islands of small tea-tree and heath, separating this hole from the first hole on the East Course – must be avoided. The green is one of the smallest on the course, with bunkers eating in of the right side and behind. It is best approached from the left half of the fairway.


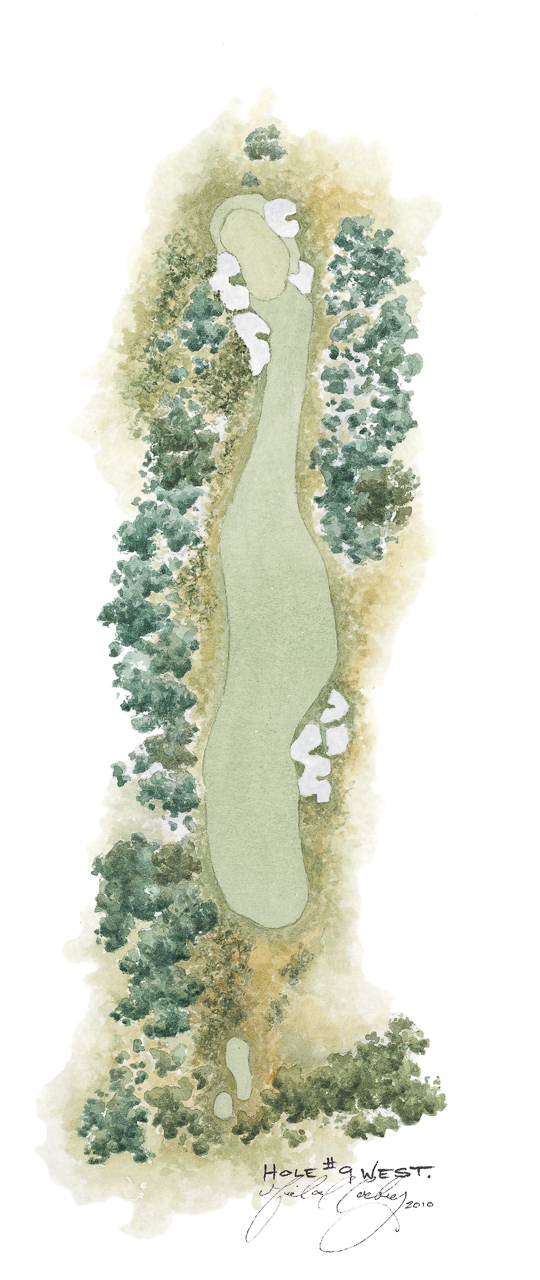
The West Course – 9th Hole
Par-4
380m / 416y
355m / 388y
The medium-length par four ninth plays over a tumbling piece of land that carries up and over a sand dune, then down to the flat ground at the bottom of the valley. The hole then climbs up to a green at the high point of the next hill. The ideal drive is down the left, opening up a green orientated from right to left, guarded on both sides by bunkers. The green is long and relatively narrow. It tips noticeably from right to left, favouring a running shot drawn in from the right.


The West Course – 10th Hole
Par-4
285m / 312y
235m / 257y
Off the tee, players are confronted by a multitude of choices of both club and line. The most obvious hazard to avoid is the huge bunker – known to Members as hell’s half-acre – embedded in the left hillside. From the tee the land drops sharply down, then rises up around the bunker and turns towards a small green at the highest point of the hill. The green is protected by deep bunkers to the right and a swale at the front of the green, which gathers up any pitch shot landing short of the putting surface.


The West Course – 11th Hole
Par-4 (Par-5 for Women)
416m / 455y
371m / 406y
The eleventh is a long par four that goes downhill then swings uphill from right to left. The ideal place to drive is the left corner of the driving area which is protected by bunkers and tea-tree. Those playing safely to the right will need an exceptional second shot to find the putting surface. The green tips noticeably to the left from its high point on the right. Players must carry the bunker short and to the right of the green to avoid an awkward length bunker shot.


The West Course – 12th Hole
Par-5
435m / 476y
417m / 456y
A par five for the Members and par four for the professionals, the tee shot on the twelfth is best suited to a long drive from right to left. The hole turns to the left , and the fairway also tips naturally down from the high point of the land to the right. For the longer hitters the nest of bunkers embedded in the rise of the hill is the best line off the tee, while there is plenty of room for shorter hitters to the right of the drive bunkers. The cross bunker and the heathland short of the green are the only hazards to be avoided when approaching the green. A small knob on the front left corner of the green can deflect shots to the left, away from the putting surface.


The West Course – 13th Hole
Par-3
134m / 147y
115m / 126y
Although the short thirteenth requires little more than a pitch with an eight or nine iron for the better golfers, the golfer who misses the green can have difficulty saving par. Complicating matters at the thirteenth is the green’s high middle section – balls hit towards the edges are more likely to roll off, often into bunkers. Shots that fall just off the back edge of the green inevitably slide down the steep slope.


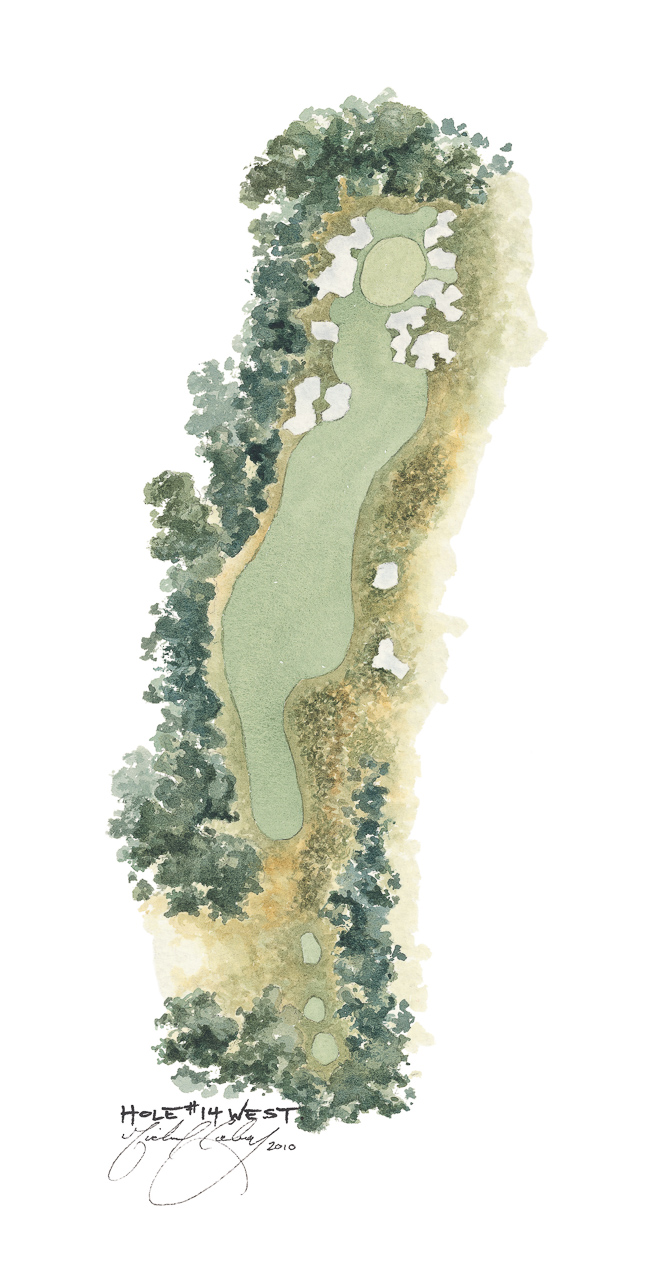
The West Course – 14th Hole
Par-4
335m / 366y
285m / 421y
The distance of this hole qualifies it in this age as a drive-and-pitch hole for the better player. The penal clump of tea-tree down the left hand side of the driving line must be avoided. Players staying too far to the right off the tee will find it impossible to get their second shots close to the flag. The green slopes away from the front-right and is surrounded by nine bunkers – making this green the most heavily fortified green on the golf course.


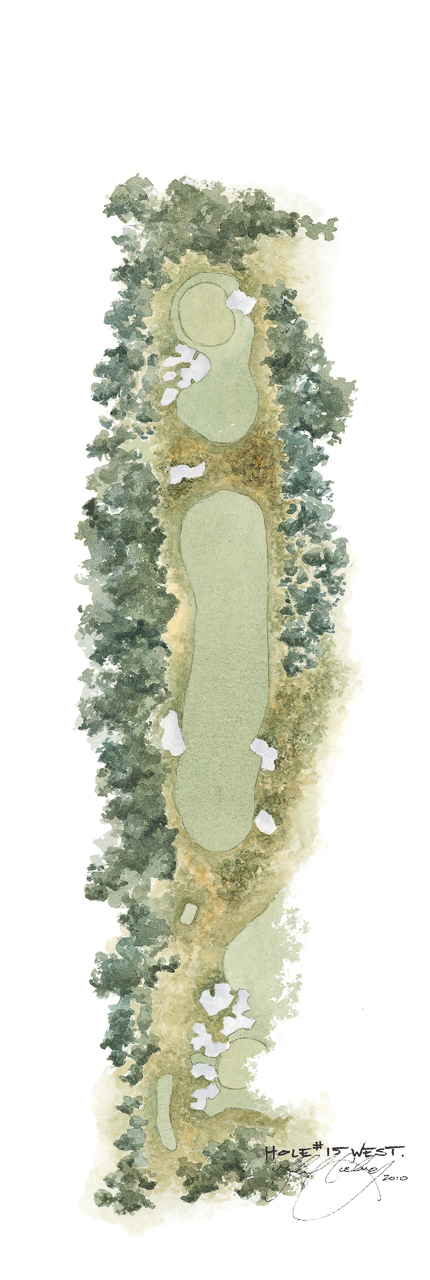
The West Course – 15th Hole
Par-5 (Par-4 for Women)
434m / 477y
310m / 339y
The fifteenth hole at first glance appears to be a straight hole, but bunkers lying short and to the left of the green leak a long way back down the fairway. The drive off the tee should be positioned to the right side of the fairway, giving the best line to the green. The cross mounds and bunkers 100m short of the green provide the most visual hazard but are generally not in play for the better golfer. Weaker golfers can lay up with their second shots before pitching on to the green. The green rises steeply from the front, and the first quarter of the putting surface is a false front.


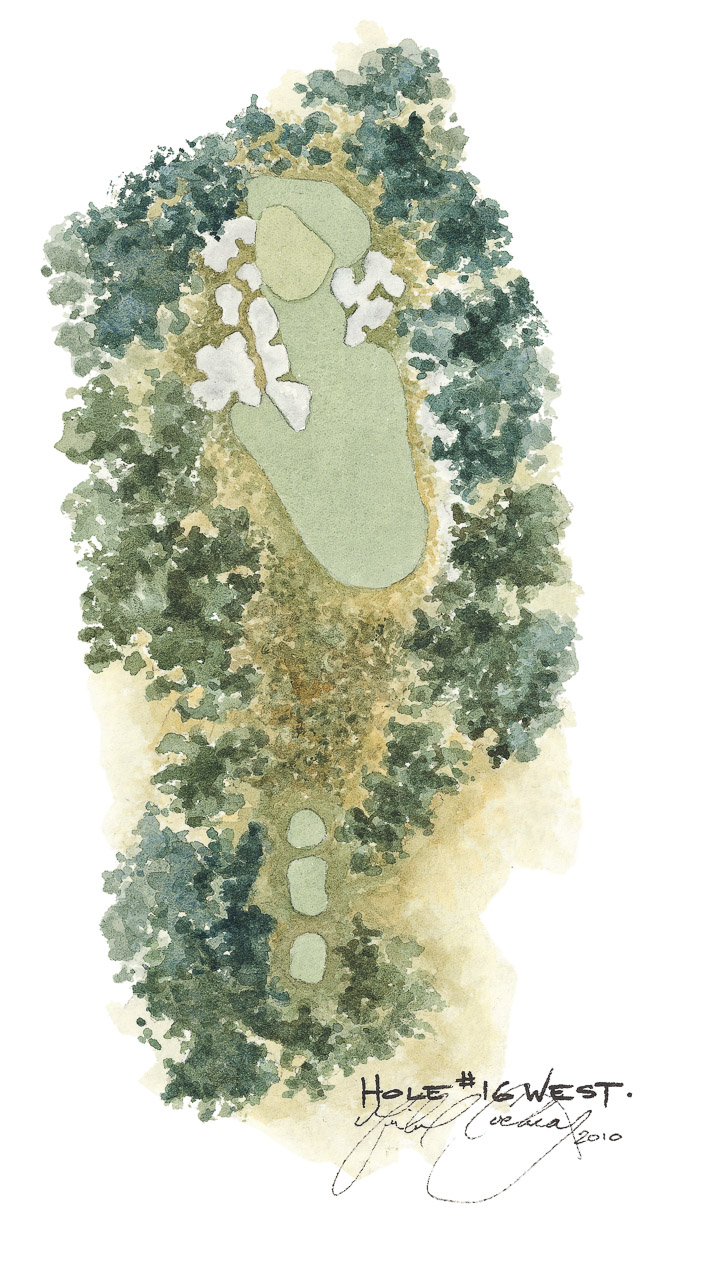
The West Course – 16th Hole
Par-3
202m / 221y
164m / 179y
The par three sixteenth hole is the longest par-three on either course. The green is guarded by a sprawling nest of bunkers to the left, and more bunkers short and to the right of the green. Designed to catch the weak push, these also serve as a strategic test for the short hitters, who will probably take two shots to reach the green. Despite its length the green is one of the smallest on the course and many a player who negotiates the front bunkers watches in horror as their balls roll off the back of the putting surface.


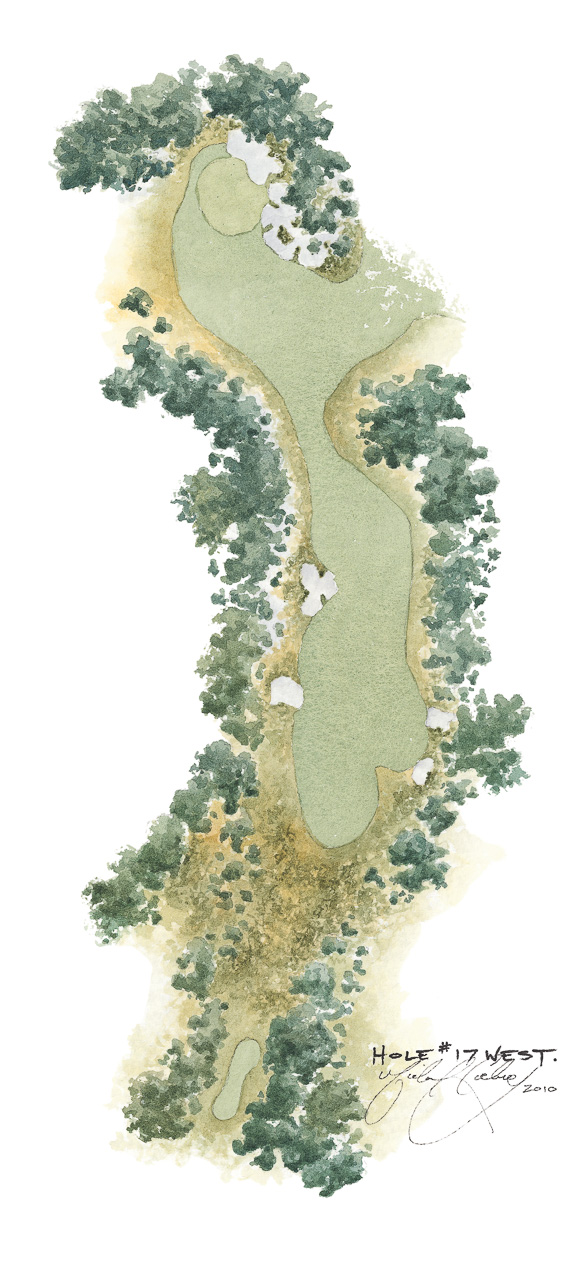
The West Course – 17th Hole
Par-4 (Par-5 for Women)
401m / 439y
381m / 417y
The long seventeenth is the quintessential strategic dogleg. Two fairway bunkers on the left of the fairway guard the perfect tee shot line to the hole. The first of these is only 150 metres from the tee and the second can only be carried by the longest of hitters. The fairway stretches out wide on the right, but for every metre the ball is pushed to the right off the tee, the approach to the green becomes more difficult. The second shot is played across a valley up to the green. Players who prefer to run their balls on to the green have ample opportunity to do so.


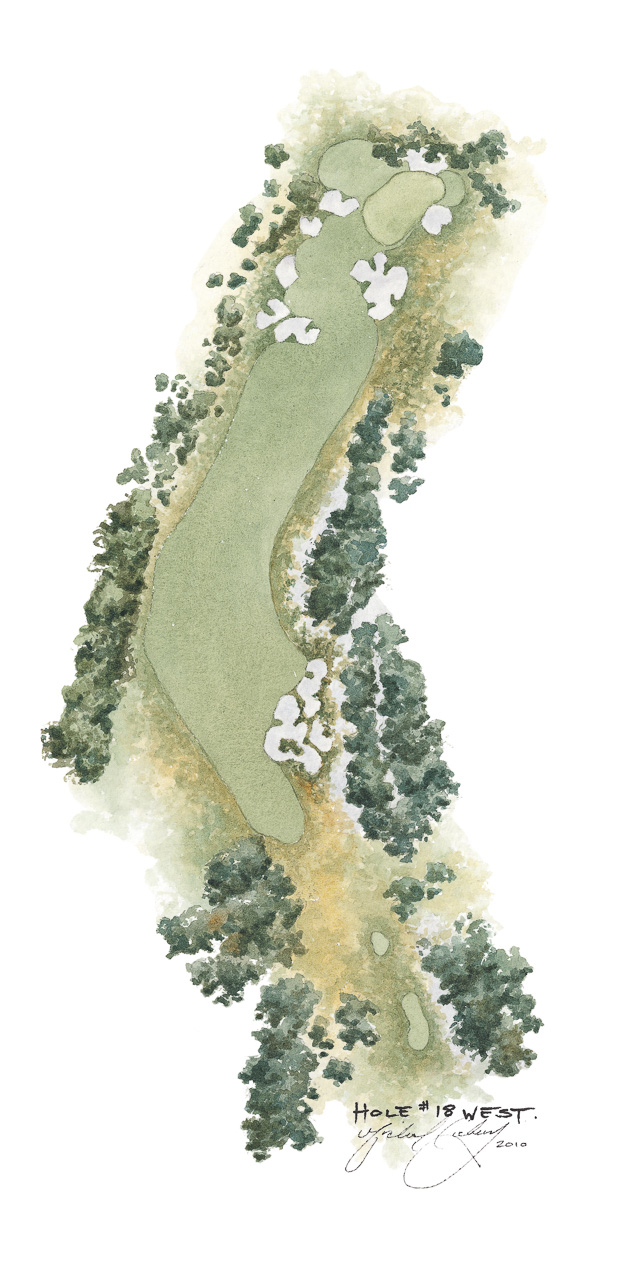
The West Course – 18th Hole
Par-4
396m / 433y
335m / 388y
The finishing hole on the West Course is a strong one. The tee shot is blind but the ideal line is clearly defined by the bunker embedded in the hill on the horizon. Stronger players fire far over the sand; those hugging the line of rough down the right inevitably finish closer to green than those driving safely down the left. The fairway tips hard from right to left, almost guaranteeing a lie above your feet for the second shot. Although bunkers cut across almost the entire length of the approach, they are not hard up against the green. The green itself slopes hard from left to right, which makes it doubly important to leave the approach shot under the hole.


West Course Scorecard - Blue Tees
Front Nine
| Hole | 1 | 2 | 3 | 4 | 5 | 6 | 7 | 8 | 9 | Out |
|---|---|---|---|---|---|---|---|---|---|---|
| Blue Tees | 392 | 449 | 324 | 461 | 161 | 391 | 135 | 346 | 380 | 3039 |
| Men’s Par | 4 | 5 | 4 | 5 | 3 | 4 | 3 | 4 | 4 | 36 |
| Women’s Par | 4 | 5 | 4 | 5 | 3 | 5 | 3 | 4 | 4 | 37 |
Back Nine
| Hole | 10 | 11 | 12 | 13 | 14 | 15 | 16 | 17 | 18 | In | Total |
|---|---|---|---|---|---|---|---|---|---|---|---|
| Blue Tees | 285 | 416 | 435 | 134 | 335 | 434 | 202 | 401 | 396 | 3038 | 6077 |
| Men’s Par | 4 | 4 | 5 | 3 | 4 | 5 | 3 | 4 | 4 | 36 | 72 |
| Women’s Par | 4 | 5 | 5 | 3 | 4 | 5 | 3 | 5 | 5 | 39 | 76 |
West Course Scorecard - Red Tees
Front Nine
| Hole | 1 | 2 | 3 | 4 | 5 | 6 | 7 | 8 | 9 | Out |
|---|---|---|---|---|---|---|---|---|---|---|
| Red Tees | 330 | 381 | 285 | 368 | 130 | 337 | 115 | 312 | 300 | 2558 |
| Men’s Par | 4 | 4 | 4 | 4 | 3 | 4 | 3 | 4 | 4 | 34 |
| Women’s Par | 4 | 5 | 4 | 5 | 3 | 4 | 3 | 4 | 4 | 36 |
Back Nine
| Hole | 10 | 11 | 12 | 13 | 14 | 15 | 16 | 17 | 18 | In | Total |
|---|---|---|---|---|---|---|---|---|---|---|---|
| Red Tees | 235 | 371 | 417 | 115 | 285 | 310 | 164 | 381 | 355 | 2633 | 5191 |
| Men’s Par | 4 | 4 | 5 | 3 | 4 | 4 | 3 | 4 | 4 | 35 | 69 |
| Women’s Par | 4 | 5 | 5 | 3 | 4 | 4 | 3 | 5 | 4 | 37 | 73 |
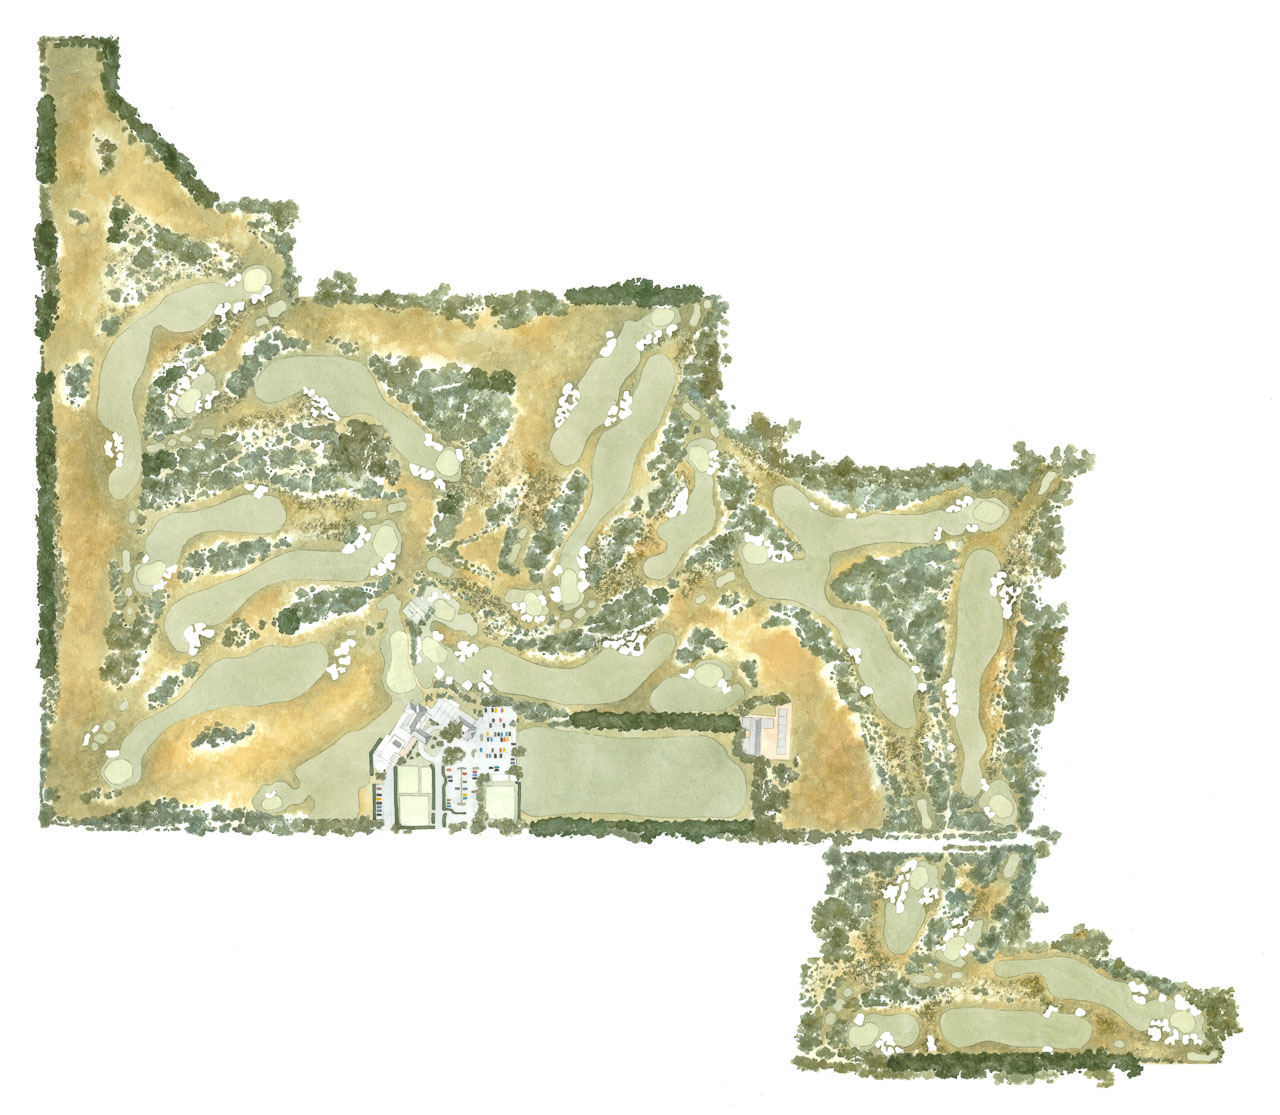
View West Course Map
Royal Melbourne West Course Map, by Mike Cocking
Numbers indicate the green location for each hole. Hover for hole descriptions.
1
In the fashion of the Old Course at St Andrews, the opening drive on the West Course is far from complicated. The fairway is large, but begins to narrow at a point where the longer hitter might reach with a big drive. The green follows the lead of the fairway, unguarded by sand apart from a small bunker on the right. A swale on the front left of the green increases the challenge of the second shot, which must be kept below the hole to allow for any kind of aggression on your opening putt.
2
Once described by West Course record-holder, Tom Crow, as one of the great risk-reward holes, the second hole rewards the player who makes the longest carry from the tee across the right edge of the fairway bunkers which cuts across the fairway on the direct line of the hole. The long second shot is influenced by the distinct slope of the green from right to left. Players who get too aggressive and run through the green face a very fast and difficult return shot.
3
The third plays over a small hill and down to a green that slopes from noticeably from front back. When the green surface is hard, this is one of the most exacting approach shots on the course. The ideal tee shot flies long down the right side of the fairway so that the approach can be played at right angles to the swale at the front of the green. The green demands a well struck pitch shot, with a poor pitch invariably sending the ball to the back of the green.
4
The fourth hole is one of three holes which architect Dr Alister MacKenzie designed around a large sand-dune. The tee shot is blind and takes golfers over the sandhill and its famous carry bunkers. Unless one is able to thread the ball between the drive bunkers on the left and tea-tree on the right, the carry is a heroic one for all but the biggest hitters. If the green is reachable the gamble is worth taking. But bunkers lying short and to the right of the green threaten the miss-hit and must be avoided.
5
The fifth is the first one-shotter on the West Course. It is one of the best par threes in Melbourne, which makes it one of the best in the world. The hole plays down from the tee, across a valley and up to a green sitting on the opposite hill. The key aim in playing the fifth is to get the ball up onto the putting surface; anything short is swept back down the bank fronting the green. Anything too long leaves a treacherous downhill putt.
6
The sixth hole is one of the great two-shot holes, a wonderful example of how to perfectly position a ground hazard on the inside corner of a dogleg. The tee shot is played over a magnificent expanse of heath and sand. The player must then make a decision whether to attempt to carry over the bunkers at the corner of the dogleg, or to opt for discretion and hit further to the left. A long drive over the bunkers to the far edge of the fairway leaves a difficult second shot over one of the most awkward greenside bunkers on the course. The green slopes sharply from front to back and the rule is a simple one: never hit the ball above the flag when it is cut in the right half of the green.
7
The green on the excellent uphill par-three seventh hole runs across the line of play. The right half of the putting surface is guarded by a deep bunker, which forces players into making a tough decision: do they play left for safety and putt across the long slope, risking a three putt, or aim over the bunker to the small pocket of green where the flattest putts are. Errant shots on this line will be punished.
8
The eighth is a short par four where most players would expect to pitch to the green with little more that an eight or nine iron. The bunkers on the left – which contain islands of small tea-tree and heath, separating this hole from the first hole on the East Course – must be avoided. The green is one of the smallest on the course, with bunkers eating in of the right side and behind. It is best approached from the left half of the fairway.
9
The medium-length par four ninth plays over a tumbling piece of land that carries up and over a sand dune, then down to the flat ground at the bottom of the valley. The hole then climbs up to a green at the high point of the next hill. The ideal drive is down the left, opening up a green orientated from right to left, guarded on both sides by bunkers. The green is long and relatively narrow. It tips noticeably from right to left, favouring a running shot drawn in from the right.
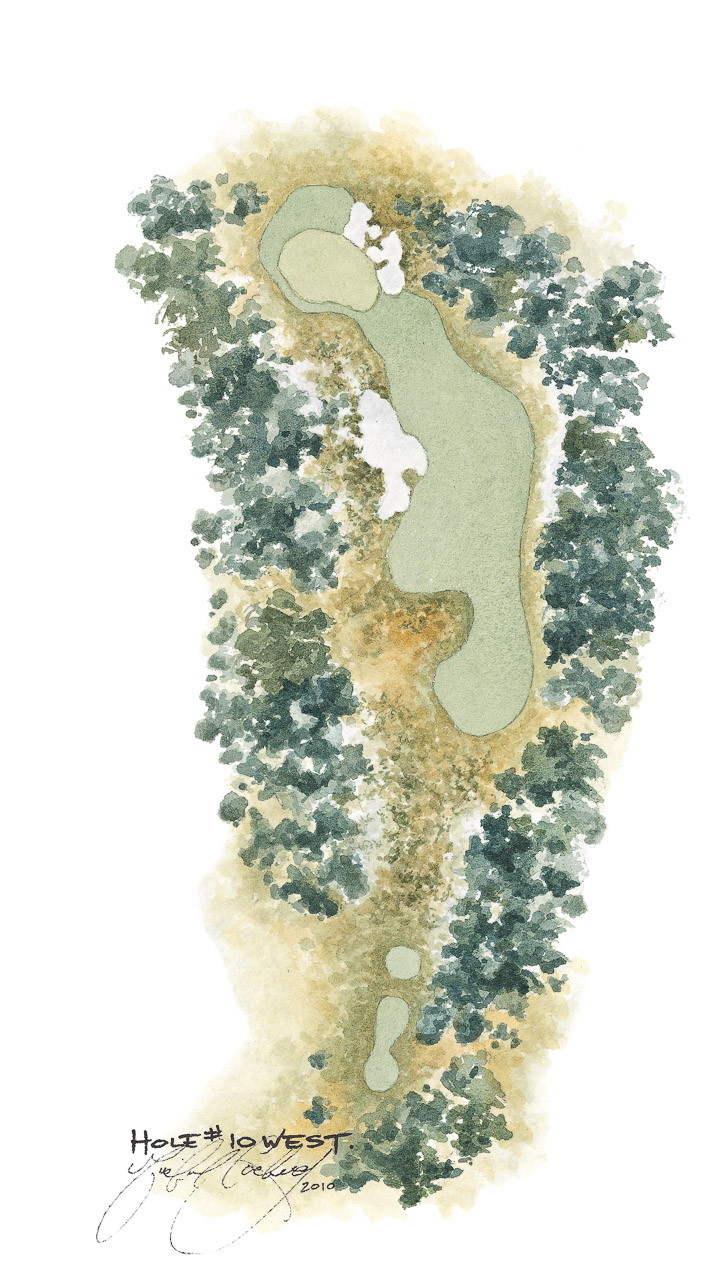
10
Off the tee, players are confronted by a multitude of choices of both club and line. The most obvious hazard to avoid is the huge bunker – known to Members as hell’s half-acre – embedded in the left hillside. From the tee the land drops sharply down, then rises up around the bunker and turns towards a small green at the highest point of the hill. The green is protected by deep bunkers to the right and a swale at the front of the green, which gathers up any pitch shot landing short of the putting surface.
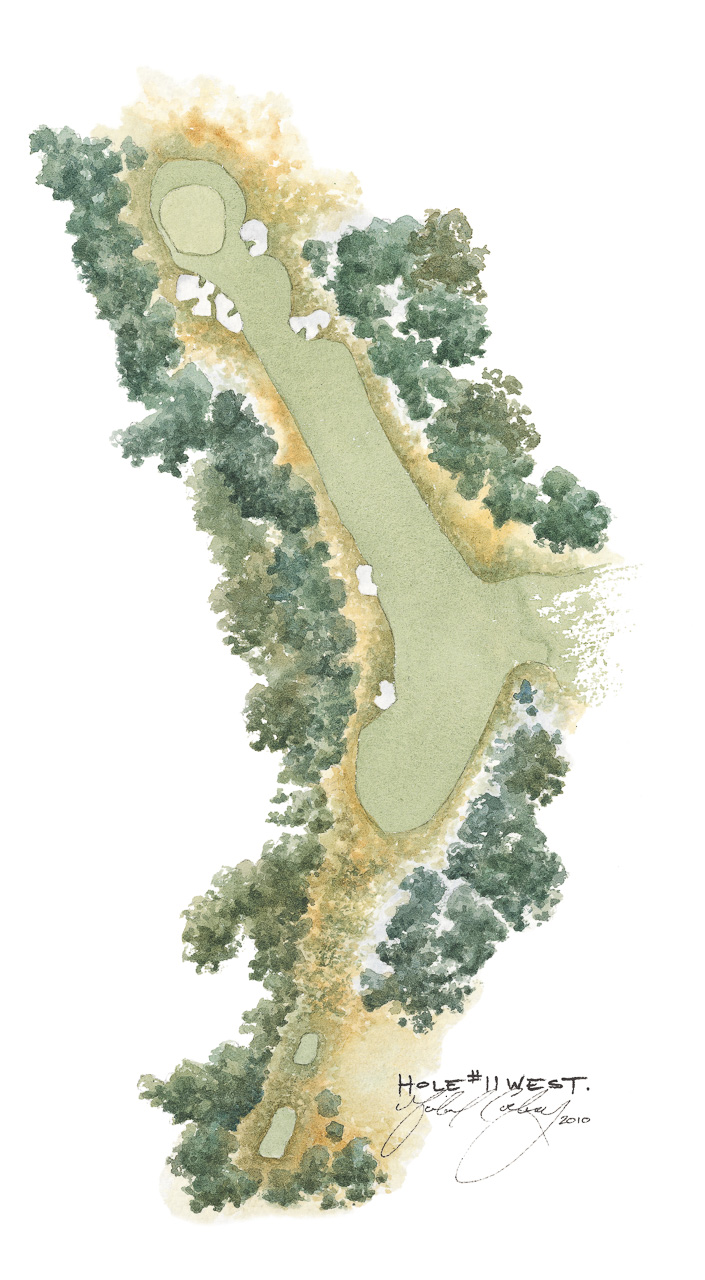
11
The eleventh is a long par four that goes downhill then swings uphill from right to left. The ideal place to drive is the left corner of the driving area which is protected by bunkers and tea-tree. Those playing safely to the right will need an exceptional second shot to find the putting surface. The green tips noticeably to the left from its high point on the right. Players must carry the bunker short and to the right of the green to avoid an awkward length bunker shot.
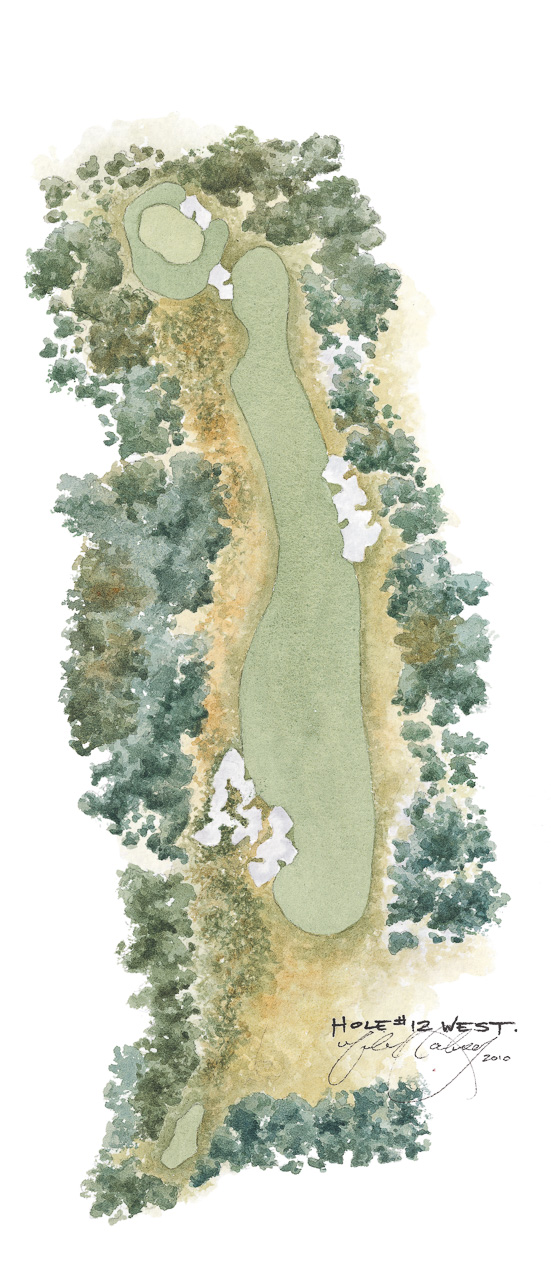
12
A par five for the Members and par four for the professionals, the tee shot on the twelfth is best suited to a long drive from right to left. The hole turns to the left , and the fairway also tips naturally down from the high point of the land to the right. For the longer hitters the nest of bunkers embedded in the rise of the hill off the tee is the best line off the tee, while there is plenty of room for shorter hitters to the right of the drive bunkers. The cross bunker and the heathland short of the green are the only hazards to be avoided when approaching the green. A small knob on the front left corner of the green can deflect shots to the left, away from the putting surface.
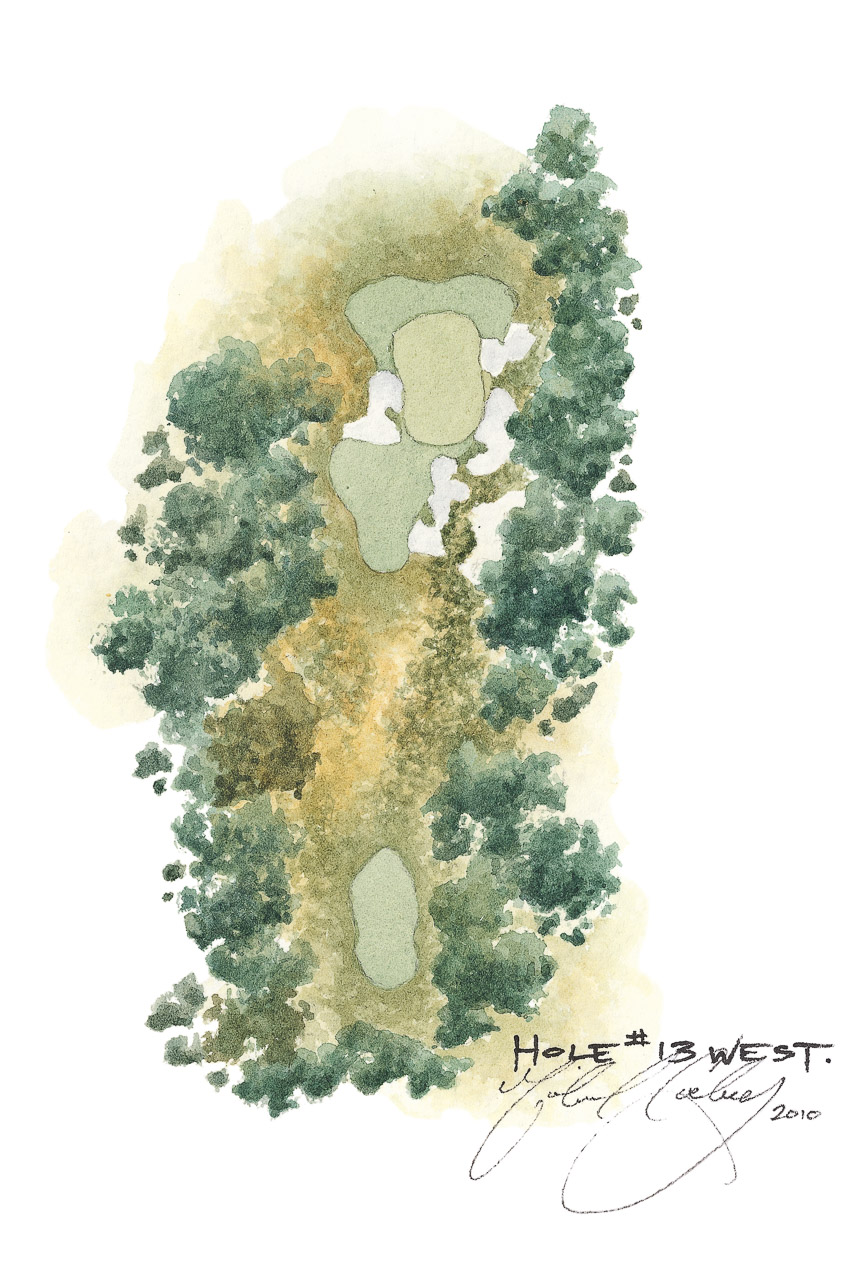
13
Although the short thirteenth requires little more than a pitch with an eight or nine iron for the better golfers, the golfer who misses the green can have difficulty saving par. Complicating matters at the thirteenth is the green’s high middle section – balls hit towards the edges are more likely to roll off, often into bunkers. Shots that fall just off the back edge of the green inevitably slide down the steep slope.
14
The distance of this hole qualifies it in this age as a drive-and-pitch hole for the better player. The penal clump of tea-tree down the left hand side of the driving line must be avoided. Players staying too far to the right off the tee will find it impossible to get their second shots close to the flag. The green slopes away from the front-right and is surrounded by nine bunkers – making this green the most heavily fortified green on the golf course.
15
The fifteenth hole at first glance appears to be a straight hole, but bunkers lying short and to the left of the green leak a long way back down the fairway. The drive of the tee should be positioned to the right side of the fairway, giving the best line to the green. The cross mounds and bunkers 100m short of the green provide the most visual hazard but are generally not in play for the better golfer. Weaker golfers can lay up with their second shots before pitching on to the green. The green rises steeply from the front, and the first quarter of the putting surface is a false front.
16
The par three sixteenth hole is the longest par-three on either course. The green is guarded by a sprawling nest of bunkers to the left, and more bunkers short and to the right of the green. Designed to catch the weak push, these also serve as a strategic test for the short hitters, who will probably take three shots to reach the green . Despite its length the green is one of the smallest on the course and many a player who negotiates the front bunkers watch in horror as their balls roll off the back of the putting surface.
17
The long seventeenth is the quintessential strategic dogleg. Two fairway bunkers on the left of the fairway guard the perfect tee shot line to the hole. The first of these is only 150 metres from the tee and the second can only be carried by the longest of hitters. The fairway stretches out wide on the right, but for every metre the ball is pushed to the right off the tee, the approach to the green becomes more difficult. The second shot is played across a valley up to the green. Players who prefer to run their balls on to the green have ample opportunity to do so.
18
The finishing hole on the West Course is a strong one. The tee shot is blind but the ideal line is clearly defined by the bunker embedded in the hill on the horizon. Stronger players fire far over the sand; those hugging the line of rough down the right inevitably finish closer to green than those driving safely down the left. The fairway tips hard from right to left, almost guaranteeing a lie above your feet for the second shot. Although bunkers cut across almost the entire length of the approach, they are not hard up against the green. The green itself slopes hard from left to right, which makes it doubly important to leave the approach shot under the hole.
The West Course Breakdown
The West Course – 1st Hole
Par-4
392m / 429y
330m / 361y
In the fashion of the Old Course at St Andrews, the opening drive on the West Course is far from complicated. The fairway is large, but begins to narrow at a point where the longer hitter might reach with a big drive. The green follows the lead of the fairway, unguarded by sand apart from a small bunker on the right. A swale on the front left of the green increases the challenge of the second shot, which must be kept below the hole to allow for any kind of aggression on your opening putt.


The West Course – 2nd Hole
Par-5
449m / 491y
381m / 417y
Once described by West Course record-holder, Tom Crow, as one of the great risk-reward holes, the second hole rewards the player who makes the longest carry from the tee across the right edge of the fairway bunkers which cuts across the fairway on the direct line of the hole. The long second shot is influenced by the distinct slope of the green from right to left. Players who get too aggressive and run through the green face a very fast and difficult return shot.


The West Course – 3rd Hole
Par-4
324m / 354y
285m / 312y
The third plays over a small hill and down to a green that slopes from noticeably from front back. When the green surface is hard, this is one of the most exacting approach shots on the course. The ideal tee shot flies long down the right side of the fairway so that the approach can be played at right angles to the swale at the front of the green. The green demands a well struck pitch shot, with a poor pitch invariably sending the ball to the back of the green.


The West Course – 4th Hole
Par-5
461m / 507y
368m / 403y
The fourth hole is one of three holes which architect Dr Alister MacKenzie designed around a large sand-dune. The tee shot is blind and takes golfers over the sandhill and its famous carry bunkers. Unless one is able to thread the ball between the drive bunkers on the left and tea-tree on the right, the carry is a heroic one for all but the biggest hitters. If the green is reachable the gamble is worth taking. But bunkers lying short and to the right of the green threaten the miss-hit and must be avoided.


The West Course – 5th Hole
Par-3
161m / 176y
130m / 142y
The fifth is the first one-shotter on the West Course. It is one of the best par threes in Melbourne, which makes it one of the best in the world. The hole plays down from the tee, across a valley and up to a green sitting on the opposite hill. The key aim in playing the fifth is to get the ball up onto the putting surface; anything short is swept back down the bank fronting the green. Anything too long leaves a treacherous downhill putt.


The West Course – 6th Hole
Par-4
391m / 428y
337m / 369y
The sixth hole is one of the great two-shot holes, a wonderful example of how to perfectly position a ground hazard on the inside corner of a dogleg. The tee shot is played over a magnificent expanse of heath and sand. The player must then make a decision whether to attempt to carry over the bunkers at the corner of the dogleg, or to opt for discretion and hit further to the left. A long drive over the bunkers to the far edge of the fairway leaves a difficult second shot over one of the most awkward greenside bunkers on the course. The green slopes sharply from front to back and the rule is a simple one: never hit the ball above the flag when it is cut in the right half of the green.


The West Course – 7th Hole
Par-3
135m / 148y
115m / 126y
The green on the excellent uphill par-three seventh hole runs across the line of play. The right half of the putting surface is guarded by a deep bunker, which forces players into making a tough decision: do they play left for safety and putt across the long slope, risking a three putt, or aim over the bunker to the small pocket of green where the flattest putts are. Errant shots on this line will be punished.


The West Course – 8th
Par-4
346m / 379y
312m / 341y
The eighth is a short par four where most players would expect to pitch to the green with little more that an eight or nine iron. The bunkers on the left – which contain islands of small tea-tree and heath, separating this hole from the first hole on the East Course – must be avoided. The green is one of the smallest on the course, with bunkers eating in of the right side and behind. It is best approached from the left half of the fairway.


The West Course – 9th Hole
Par-4
380m / 416y
355m / 388y
The medium-length par four ninth plays over a tumbling piece of land that carries up and over a sand dune, then down to the flat ground at the bottom of the valley. The hole then climbs up to a green at the high point of the next hill. The ideal drive is down the left, opening up a green orientated from right to left, guarded on both sides by bunkers. The green is long and relatively narrow. It tips noticeably from right to left, favouring a running shot drawn in from the right.


The West Course – 10th Hole
Par-4
285m / 312y
235m / 257y
Off the tee, players are confronted by a multitude of choices of both club and line. The most obvious hazard to avoid is the huge bunker – known to Members as hell’s half-acre – embedded in the left hillside. From the tee the land drops sharply down, then rises up around the bunker and turns towards a small green at the highest point of the hill. The green is protected by deep bunkers to the right and a swale at the front of the green, which gathers up any pitch shot landing short of the putting surface.


The West Course – 11th Hole
Par-4 (Par-5 for Women)
416m / 455y
371m / 406y
The eleventh is a long par four that goes downhill then swings uphill from right to left. The ideal place to drive is the left corner of the driving area which is protected by bunkers and tea-tree. Those playing safely to the right will need an exceptional second shot to find the putting surface. The green tips noticeably to the left from its high point on the right. Players must carry the bunker short and to the right of the green to avoid an awkward length bunker shot.


The West Course – 12th Hole
Par-5
435m / 476y
417m / 456y
A par five for the Members and par four for the professionals, the tee shot on the twelfth is best suited to a long drive from right to left. The hole turns to the left , and the fairway also tips naturally down from the high point of the land to the right. For the longer hitters the nest of bunkers embedded in the rise of the hill off the tee is the best line off the tee, while there is plenty of room for shorter hitters to the right of the drive bunkers. The cross bunker and the heathland short of the green are the only hazards to be avoided when approaching the green. A small knob on the front left corner of the green can deflect shots to the left, away from the putting surface.


The West Course – 13th Hole
Par-3
134m / 147y
115m / 126y
Although the short thirteenth requires little more than a pitch with an eight or nine iron for the better golfers, the golfer who misses the green can have difficulty saving par. Complicating matters at the thirteenth is the green’s high middle section – balls hit towards the edges are more likely to roll off, often into bunkers. Shots that fall just off the back edge of the green inevitably slide down the steep slope.


The West Course – 14th Hole
Par-4
335m / 366y
285m / 421y
The distance of this hole qualifies it in this age as a drive-and-pitch hole for the better player. The penal clump of tea-tree down the left hand side of the driving line must be avoided. Players staying too far to the right off the tee will find it impossible to get their second shots close to the flag. The green slopes away from the front-right and is surrounded by nine bunkers – making this green the most heavily fortified green on the golf course.


The West Course – 15th Hole
Par-5 (Par-4 for Women)
434m / 477y
310m / 339y
The fifteenth hole at first glance appears to be a straight hole, but bunkers lying short and to the left of the green leak a long way back down the fairway. The drive of the tee should be positioned to the right side of the fairway, giving the best line to the green. The cross mounds and bunkers 100m short of the green provide the most visual hazard but are generally not in play for the better golfer. Weaker golfers can lay up with their second shots before pitching on to the green. The green rises steeply from the front, and the first quarter of the putting surface is a false front.


The West Course – 16th Hole
Par-3
202m / 221y
164m / 179y
The par three sixteenth hole is the longest par-three on either course. The green is guarded by a sprawling nest of bunkers to the left, and more bunkers short and to the right of the green. Designed to catch the weak push, these also serve as a strategic test for the short hitters, who will probably take three shots to reach the green . Despite its length the green is one of the smallest on the course and many a player who negotiates the front bunkers watch in horror as their balls roll off the back of the putting surface.


The West Course – 17th Hole
Par-4 (Par-5 for Women)
401m / 439y
381m / 417y
The long seventeenth is the quintessential strategic dogleg. Two fairway bunkers on the left of the fairway guard the perfect tee shot line to the hole. The first of these is only 150 metres from the tee and the second can only be carried by the longest of hitters. The fairway stretches out wide on the right, but for every metre the ball is pushed to the right off the tee, the approach to the green becomes more difficult. The second shot is played across a valley up to the green. Players who prefer to run their balls on to the green have ample opportunity to do so.


The West Course – 18th Hole
Par-4
396m / 433y
335m / 388y
The finishing hole on the West Course is a strong one. The tee shot is blind but the ideal line is clearly defined by the bunker embedded in the hill on the horizon. Stronger players fire far over the sand; those hugging the line of rough down the right inevitably finish closer to green than those driving safely down the left. The fairway tips hard from right to left, almost guaranteeing a lie above your feet for the second shot. Although bunkers cut across almost the entire length of the approach, they are not hard up against the green. The green itself slopes hard from left to right, which makes it doubly important to leave the approach shot under the hole.


The Royal Melbourne
Golf Club
Cheltenham Road, Black Rock
Victoria, Australia 3193
Contact Us
+61 3 9599 0500
rmgc@royal.melbourne
